How To Resurface A Bowling Ball – 3 Essential Steps To Follow
The performance of the bowling ball depends on how you resurface it well and manage to overlook the basic maintenance that increases its reactivity and ultimately lifespan.
There are several reasons that affect the performance of the ball however mainly, the coverstock of the bowling ball loses its reactivity due to the dirt or oil on the lane that absorbs by the ball. There are microscopic pores in the coverstock that generate or improve the hook potential which affects by these dirt particles.
Did your bowling ball perform poorly on the lane? And want to know how to resurface a bowling ball. Here we have a complete guide to how you go through the steps with recommended tools and materials used during the process.
Understanding The Nature Of Coverstock
The coverstock of the bowling ball influences most of its performance and if you can’t take care by applying basic maintenance or resurfacing, ultimately you will end up defeated by your competitor.
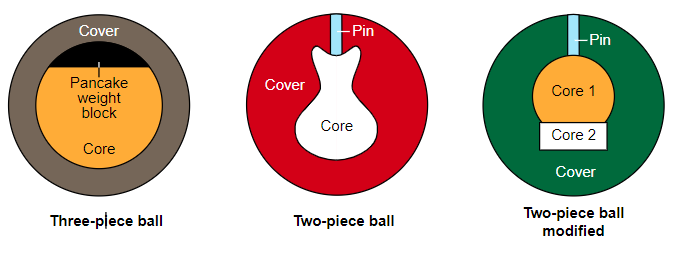
In modern days of bowling, the bowling ball consists of filler, weight blocks, and an outer shell also called coverstock depending on two-piece or three-piece. Besides two-piece and three-piece, the performance of the bowling ball depends on the coverstock up to 60-70%.
Whether you prefer oil lane or dry, normally the bowling ball is either made for sanded or polished. If you want an early hook on the oily lane then you will need sanded coverstock however the polished one is preferred if your priority is to move the bowling ball keep down the lane.
Basic Maintenance Of Bowling Ball
The maintenance of the equipment is one of the essential things to consider for any bowler. This will not only help you to provide decent performance but also take your gear in the right way and be long-lasting.
Among the other equipment, the bowling ball requires a significant investment and is one of the necessary parts of bowling. To keep the bowling ball in good and striking condition, you can’t ignore regular maintenance.
The basic maintenance of the bowling ball including wiping the ball after every game must be on your to-do list for every bowling day. The bowling ball accumulates specks of dirt and oil that absorb during rolling on the lane. Once you start wiping the bowling ball after every gameplay, it will improve its rolling consistency.
Essential Materials And Tools You Will All Need:
- Bowling Ball Spinner: To perform a resurfacing job constantly, you will use a bowling ball spinner that assists and is used in the overall process. Check here how to make a bowling ball spinner at home
- Abrasive: Applying the abrasive on the ball helps bowlers to control the roughness of the lane, reduce the marks of pressure and give a decent cleaning of a bowling ball. Normally, the abrasive uses aluminum oxide or most commonly silicon carbide, tungsten carbide, and garnet. There are ranges of grit starting from 80 to 5000 grit.
- Water: During the resurfacing process, you will need a bowl of water that facilitates you to clean the ball as abrasive pads generate dust during resurfacing. It will also keep the ball cool from the warmness because the sanding process creates heat.
- Towel and Polishing Pads: Once you finish sanding the bowling ball, you will need different towels or polishing pads for cleaning and applying polish or compound on the ball. Always use a different cloth or towel whenever you apply the compound or polish.
- Compound And Polish: Giving an extra finish to the bowling ball, use compound and polish on the ball.
How To Resurface A Bowling Ball – 3 Steps
After assembling all the mentioned material above, it’s time to move to the actual process of resurfacing the bowling ball. All you need to understand is what you achieve from the resurfacing technique.
The amount of grit you apply to the ball matters a lot and if you know how much grit you need during the process, you can get a controllable and more reactive bowling ball.
If you want a decent rolling ball over oily lanes then lower grit is the obvious approach during resurfacing. In contrast, higher grit removes more surface and gives additional control over the bowling ball during the hook phase.
Step 1: Place The Bowling Ball On Spinner
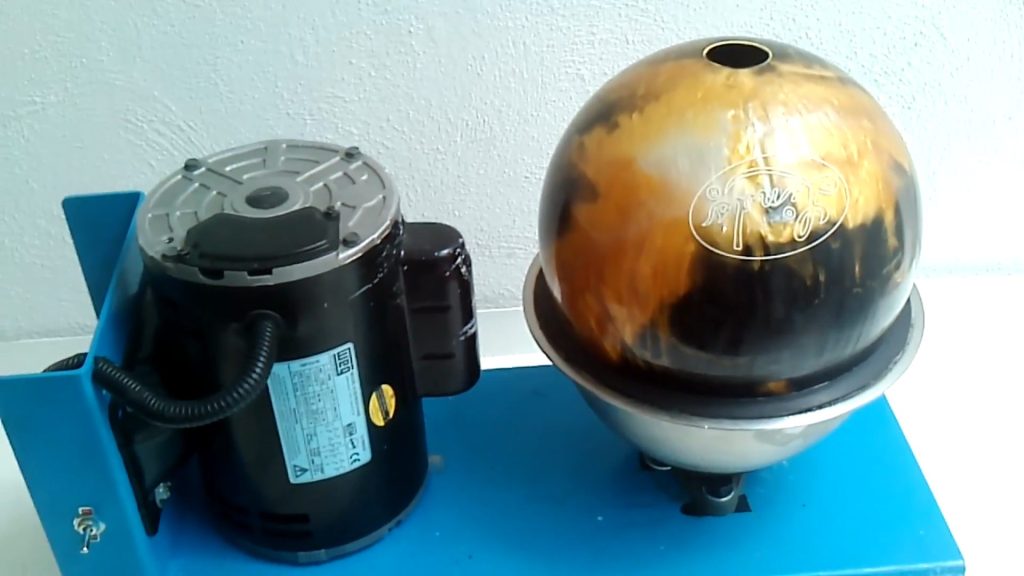
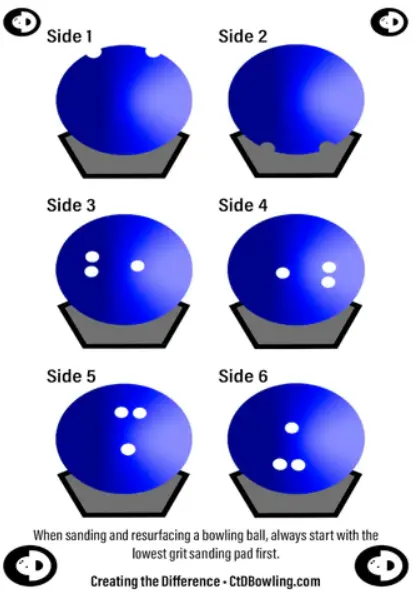
In this process, you will need to pick the bowling ball and place it on the spinner. To make sure, the bowling ball resurfaces from all sides, start positioning the area of the holes on the top. Once you have done the area of the hole rotate it 180 degrees to the bottom side. After that, move the bowling ball to 90 degrees and start resurfacing.
There are 6 sides you have to go through each one by rotating the bowling ball as shown in the figure. The reason for the 6 sides is to keep the bowling ball round. Make sure you reach each of the sides by rotating it properly.
Step 2: Start Applying The Abrasive Pads
The most important step in resurfacing the bowling ball is to apply the abrasive pads efficiently and correctly.
Set the speed of the spinner to the lowest level to minimize mistakes if the spinner has the dual setting of speed however the single setting of speed is also okay to stick with that is the default one, and it will also work.
Take all the sets of abrasive pads and pick the lowest one. Apply some water to the bowling ball and pad that keeps it hydrated during the process. Using water consistently will help you to save your hand from the heat that is generated during the fraction of bowling ball and pad.
To prevent any injury, use the palm instead of your fingers on the ball while hovering.
Now, you can go with the process, take the lowest number of grit pads, use water on the pad and bowling ball, and place the pads on the ball through your palm. Apply some pressure on the pads with your palm or more pressure when you’re using lower grit on the ball. Keep your hand up and then down while applying abrasive pads.
Apply each pad of grip for up to 5 up-down of hands or 30 seconds or observe the lines that are no more available on the bowling ball.
Repeat the process for all the other sides and then change the grit to pick a higher one depending on the purpose of your resurfacing. There are different numbers of grits from 80, 120, 220, 360, 500, 1000, 2000, 3000, 4000, and 5000 grit. Go through the process for each of your grit.
Make sure to use each grit in sequence if you use 1000 grit then you need to apply 2000 or you can’t move to 1000 right after applying the 4000 grit.
Step 3: Wipe The Bowling Ball And Apply Polish And Compound.
After finishing the sanding process, it’s time to wipe the dust and water from the ball. Pick a towel or any bowling ball cleaner and remove the drops of water from the ball. Keep the ball on the spinner and use a towel to dry the ball.
Once you dry the bowling ball, apply the compound on the bowling ball that ensures better contact of the ball with the lane. Set a spinner on high speed and start applying compound on the bowling ball with a cloth.
Finally, it’s time to shine the bowling ball with polish. Take a separate cloth and implement the polish on the ball.
Hurrah! Your bowling ball is ready for the game.
Lastly.
It’s recommended to go through the bowling ball resurfacing process after every 60 to 75 games depending on the lane condition. Resurface your bowling ball if the ball is sanded frequently and the brand logo is not visible more.
What To Do With Cracked Bowling Ball
If the bowling ball is just old and does not have cracks too much then have a look at a pro shop that can fix it, however, a cracked bowling ball with a lot of damage can be harmful and cause severe injury.
The bowling ball can be utilized for several other reasons:
You can use the bowling ball for decoration pieces in a garden or showcase it on a table. Regardless of decoration, you can also donate it to zoos or youth centers.
Do you want some more ideas, on how to utilize the crack/old bowling ball for other purposes?
Read more: What to do with an old bowling ball – 13 Repurposed Ideas
Conclusion:
After excessive use of the bowling ball, it loses its performance and reactivity on the lane and you need to go through the bowling ball resurfacing process.
There are different tools and materials that need to be done for the resurfacing process including a bowling ball spinner, abrasive pads, water, and compound or polish. All you need to go through the steps by resurfacing and all done! The bowling ball is ready to use for the game.

Ashley Ellison is a skilled writer and avid bowler. Her passion for storytelling and dedication to the sport have led her to participate in various national bowling leagues. With a unique combination of talents, Ashley approaches every challenge with creativity and a relentless drive to succeed.