16 Halloween Door Contest Ideas That Could Win
A Halloween door contest gets surprisingly serious once everyone starts decorating. One person hangs three paper bats. Someone else somehow builds an entire haunted mansion before lunch. Suddenly, your innocent little office or classroom competition feels like a seasonal design championship.
The good news? Winning Halloween door contest ideas usually aren’t about covering every inch with expensive decorations. The memorable doors have one strong concept that people understand immediately.
I’ve always preferred designs that actually transform the door rather than simply decorate it. A doorway can become a monster’s mouth, a haunted elevator, a witch’s cupboard, or even an archaeological dig. That’s where things get interesting.
These 16 ideas deliberately take different approaches, from optical illusions and dimensional builds to funny scenes and genuinely creepy designs. Most can also be adapted for classrooms, offices, dorms, community centers, or home Halloween competitions.
1. Turn the Entire Door Into a Giant Monster Mouth
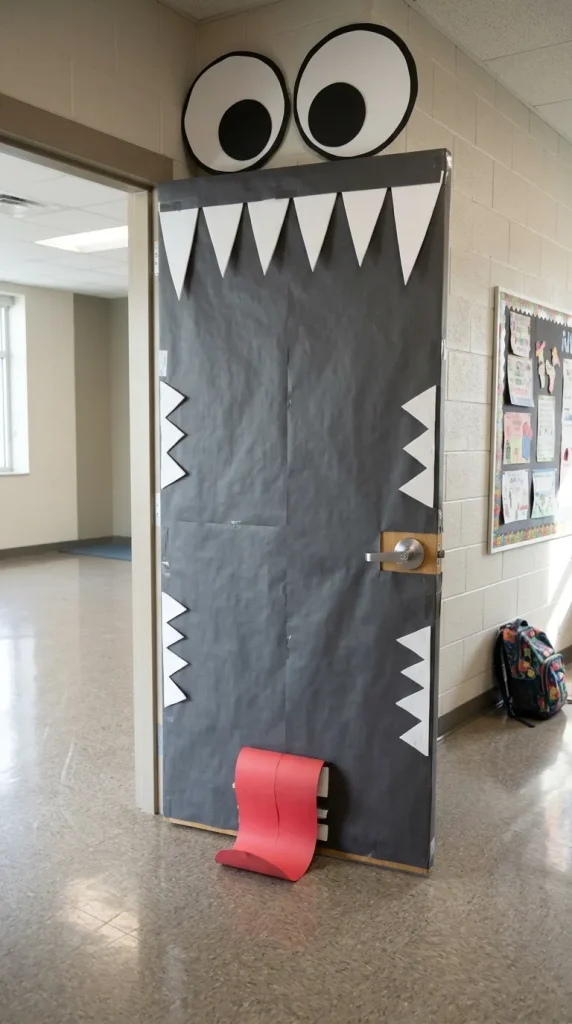
Instead of placing a monster on your door, make the door become the monster.
Cover the surface with dark green, purple, or charcoal paper. Create oversized eyes above the doorway and build jagged teeth from lightweight white foam board. Position the upper teeth along the top and shorter teeth around the sides so people appear to walk directly into the creature’s mouth.
A curled paper tongue near the bottom adds dimension without making the doorway difficult to use.
The secret is scale. Tiny eyes and teeth make this look like a children’s craft. Huge features turn the architecture itself into the character.
Keep the actual handle completely accessible and avoid anything dangling across the walking path.
A few things you might like
- OLFA craft knife: Helpful for getting crisp triangular teeth from foam board.
- Scotch Wall-Safe Tape: Useful for securing lightweight paper details temporarily.
- Self-healing cutting mat: Makes cutting oversized shapes much easier and protects your table.
2. Create a Haunted Hotel Elevator
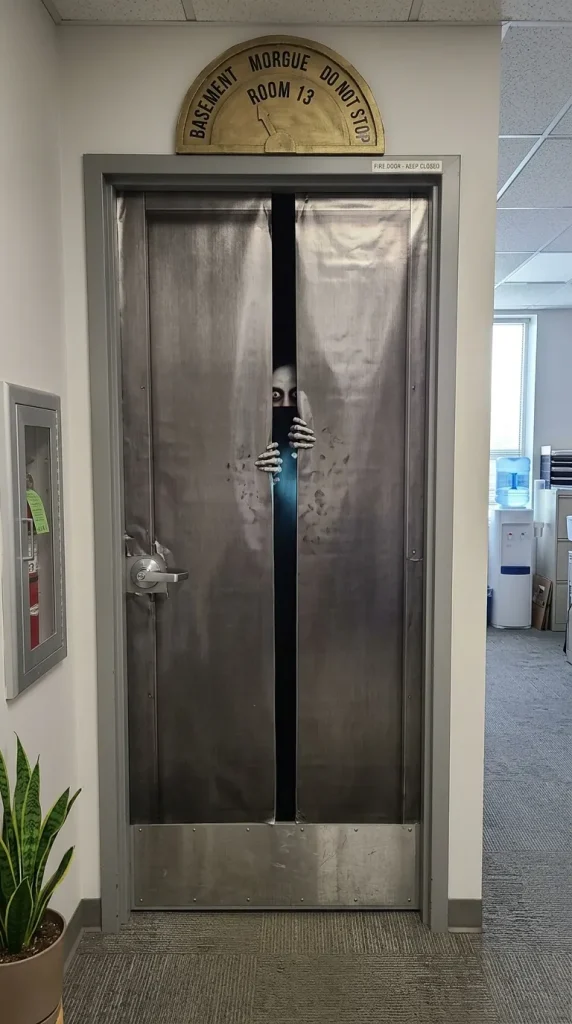
This one works especially well on plain metal or gray office doors.
Turn the doorway into an abandoned hotel elevator. Use removable dark metallic-looking paper to create elevator panels, then add an old-fashioned floor indicator above the frame. Instead of normal numbers, label the floors things like Basement, Morgue, Room 13, and “Do Not Stop.”
The fun detail is the opening.
Create two narrow faux elevator doors with a dark gap between them. Inside that gap, reveal only a pair of eerie eyes or skeletal fingers.
Keep everything relatively flat so the illusion does the work.
Give these a look
- Metallic silver contact paper: Creates the elevator finish without actual metal panels.
- Battery-operated puck light: Adds a dim overhead glow around the floor indicator.
- Black removable vinyl: Useful for creating panel seams, numbers, and warning lettering.
3. Build a Witch’s Potion Cabinet
Here’s a door that rewards people for getting closer.
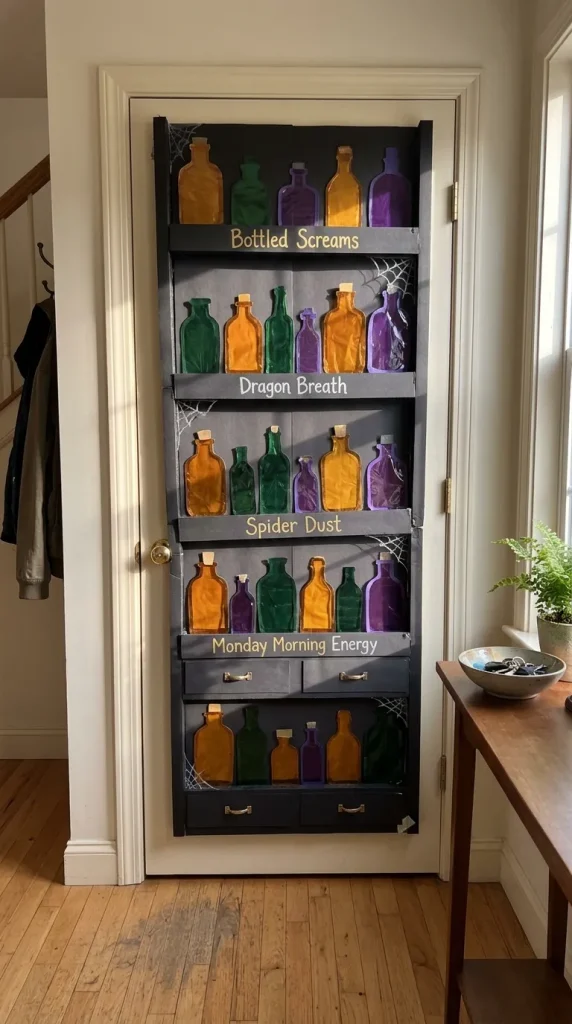
Transform the surface into an enormous witch’s apothecary cabinet filled with crooked shelves, potion bottles, ingredient labels, drawers, and mysterious compartments.
Rather than attaching heavy bottles, cut bottle silhouettes from translucent colored cellophane or cardstock. Layer them over black shelving so they resemble glowing glass containers.
Labels are where you can have fun: “Bottled Screams,” “Dragon Breath,” “Spider Dust,” and “Monday Morning Energy” all work.
FYI, slightly crooked shelves actually make this design better. Perfect symmetry feels too polished for a witch’s cupboard.
Maybe worth checking out
- Metallic paint markers: Great for tiny potion labels and faux brass details.
- Colored cellophane sheets: Give flat bottle cutouts a convincing glass-like appearance.
- Black foam board: Creates lightweight dimensional shelves without bulky lumber.
4. Make a Giant Spider Web With a Captured Victim
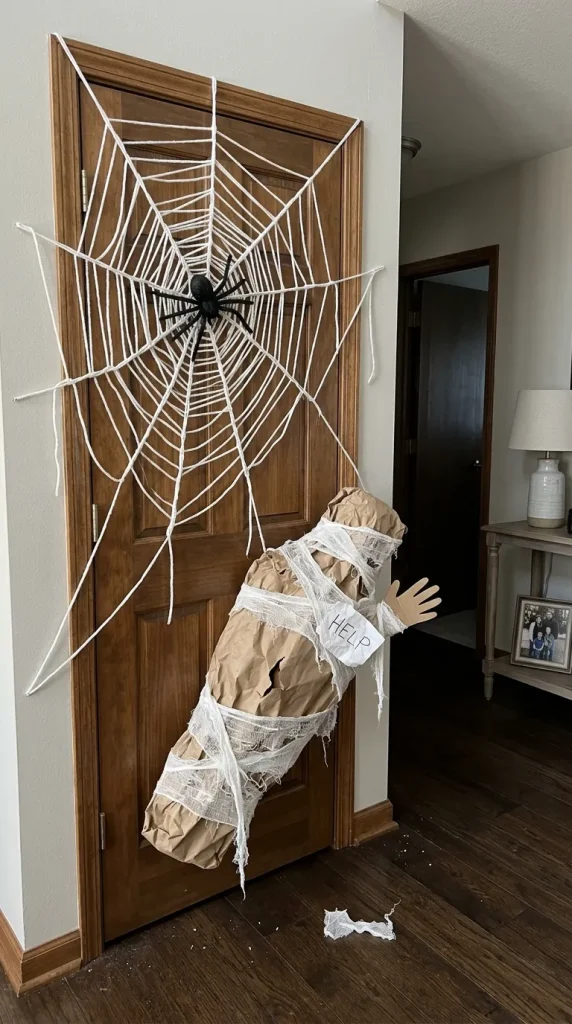
Spider doors are common. A three-dimensional captured-person scene feels completely different.
Stretch thick white yarn from multiple points around the frame to create one oversized web. Then build a lightweight human-shaped cocoon from crumpled kraft paper wrapped loosely with white gauze.
Only reveal a shoe, cardboard hand, or little handwritten “HELP” sign.
The asymmetry makes this work. Put the web’s center in one upper corner instead of directly in the middle, then position the cocoon diagonally below it.
A large lightweight spider near the web’s center finishes the story.
Useful items to consider
- White cotton gauze roll: Gives the cocoon believable layered texture.
- Command Decorating Clips: Help anchor lightweight web strands without visible hardware.
- Heavy white craft yarn: Holds its web shape better than wispy artificial cobweb material.
5. Design a Skeleton Archaeological Dig
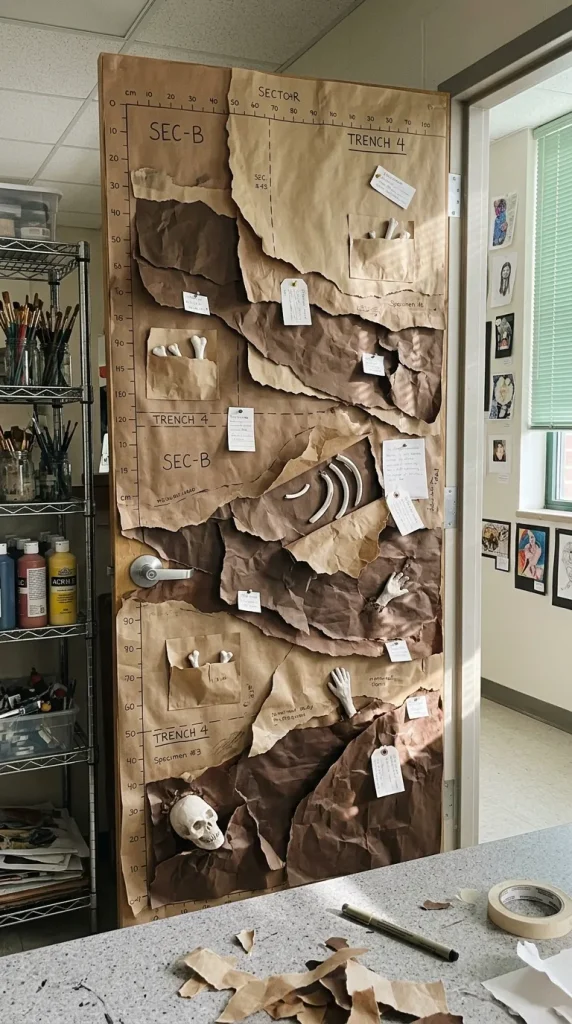
This is one of my favorites because it doesn’t look like standard Halloween décor.
Cover the door in brown kraft paper and make it resemble a vertical archaeological excavation site. Add darker torn-paper soil layers, measurement markings, specimen numbers, and partially exposed skeletal remains.
Instead of mounting a complete plastic skeleton, reveal only sections: a skull here, ribs there, perhaps one hand disappearing beneath another “soil” layer.
Add small evidence tags beside each discovery.
The result feels halfway between a museum exhibit and a crime scene, which makes people stop and actually inspect it.
A few relevant products
- Brown kraft paper roll: Creates the excavation background and layered earth sections.
- White air-dry clay: Handy for making small lightweight bone fragments.
- Black fineliner pens: Perfect for measurement marks, specimen numbers, and field notes.
6. Turn the Door Into a Boarded-Up Haunted House
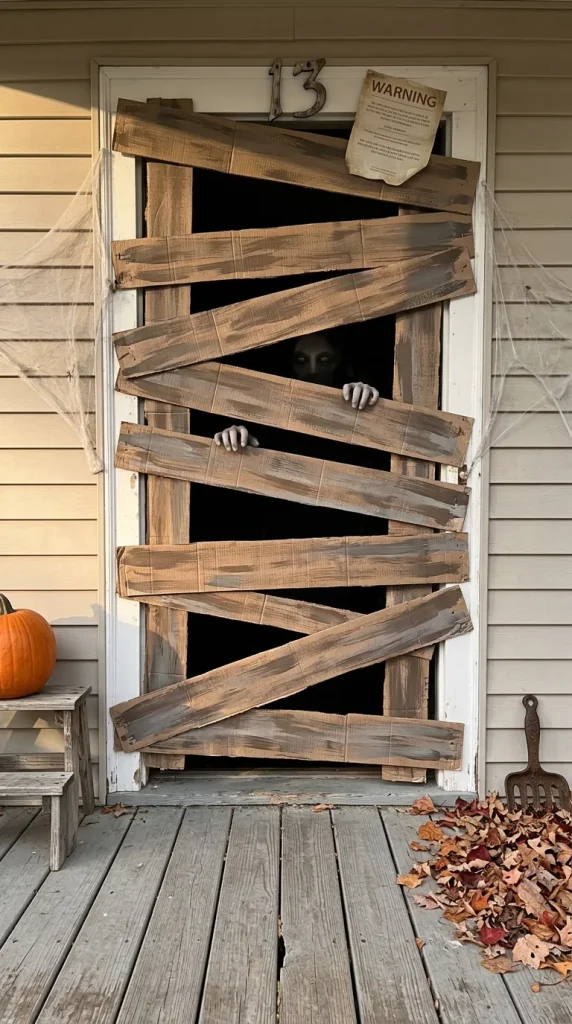
Instead of showing a haunted house from outside, make viewers feel as though they’re standing directly in front of one.
Start with a black or weathered-gray background. Create several faux wooden planks from long strips of corrugated cardboard, painted unevenly in brown and gray.
Attach them diagonally across the “entrance,” leaving deliberate gaps.
Behind those gaps, place creepy eyes, ghostly hands, or a shadowy face.
Add a distressed house number such as 13 and one crooked warning notice.
Dimensional layering matters here. Raise some boards slightly with foam spacers so shadows form naturally underneath them.
Possibly handy products
- Corrugated cardboard sheets: Lightweight enough for convincing faux wooden boards.
- Acrylic craft paint set: Useful for layering brown, gray, and black weathering.
- Foam mounting squares: Give selected boards subtle depth and natural-looking shadows.
7. Create a Ghost Portrait Gallery
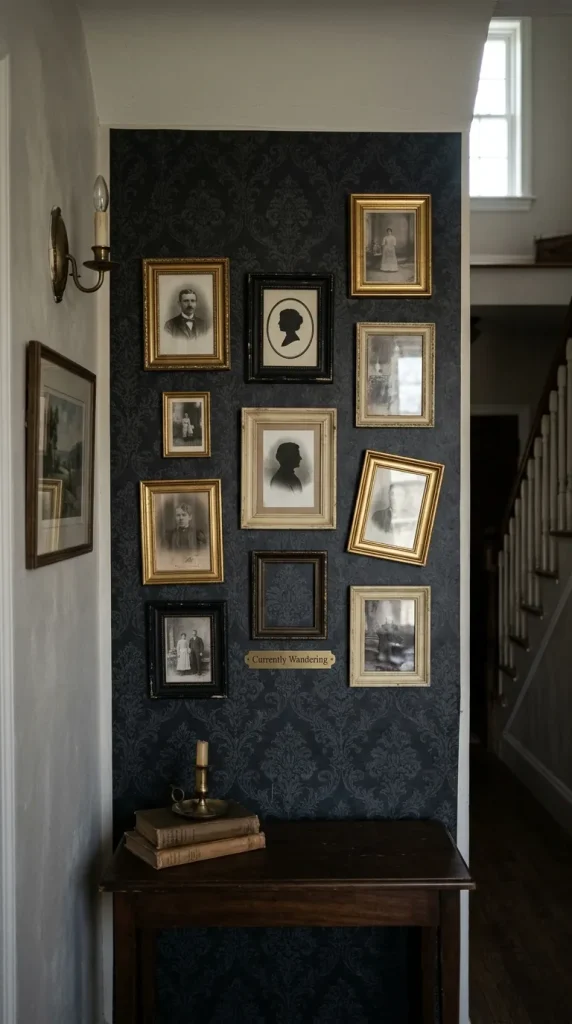
Want something spooky without fake blood everywhere? Try an old haunted portrait wall.
Cover the door in dark wallpaper-style paper and arrange several mismatched lightweight frames. Inside each frame, place black-and-white Victorian-style ghost portraits, silhouettes, or your own funny edited photographs.
Here’s the detail that sells it: one portrait should be empty.
Place a little nameplate underneath that reads something like “Currently Wandering.”
Keep the palette restrained—black, antique gold, cream, and faded gray. That makes the door feel deliberately designed rather than crowded with Halloween supplies.
A few favorites
- Antique-gold rub-on wax: Helps inexpensive lightweight frames look convincingly aged.
- Matte photo paper: Keeps printed portraits from looking overly glossy.
- Removable picture-hanging strips: Useful for mounting lightweight frames on suitable surfaces.
8. Make an Alien Containment Chamber
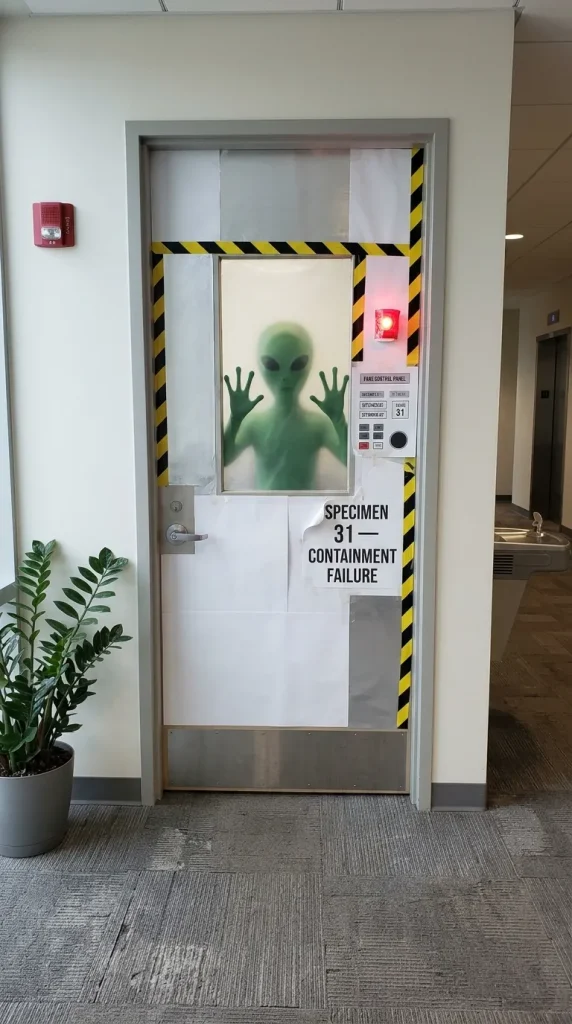
Not every Halloween contest door needs witches and pumpkins.
Transform yours into a secret laboratory containment unit. Use white, silver, and hazard-yellow details around the doorway. Add fake control panels, specimen numbers, warning stripes, and a large central “window.”
Behind the window, show a green alien silhouette pressed against translucent plastic.
Red cellophane over a battery light can create an emergency-warning effect without needing complicated electronics.
A label like “SPECIMEN 31 — CONTAINMENT FAILURE” gives people the entire story in seconds.
Helpful additions
- Red transparent cellophane: Creates an inexpensive emergency-light filter.
- Yellow-and-black hazard tape: Gives the laboratory edges instant visual clarity.
- Battery LED tap light: Adds safe illumination without trailing power cords.
9. Build a Halloween Crime Scene
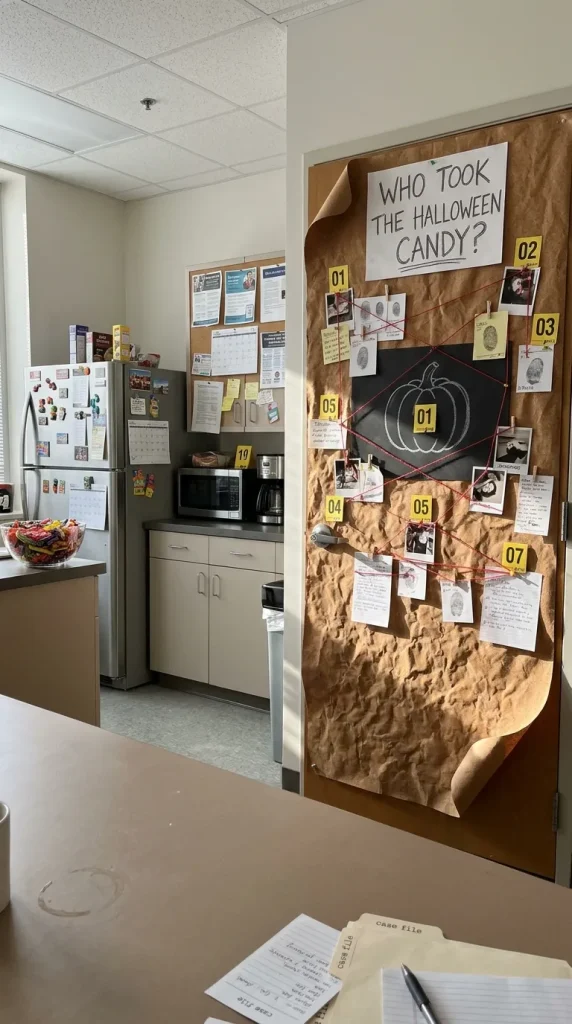
This idea works brilliantly for workplace contests because the little clues can reference coworkers or departments.
Design the door like an exaggerated detective evidence board. Add numbered evidence markers, fingerprints, suspicious notes, photographs, red string, and a chalk-style silhouette.
Instead of making it genuinely gruesome, make the “crime” ridiculous.
Maybe somebody stole the office Halloween candy. Perhaps the victim is a smashed foam pumpkin. Every clue points toward increasingly suspicious coworkers.
Now people aren’t merely looking at your door—they’re solving it.
Practical extras
- Mini wooden clothespins: Hold evidence cards and photos without overwhelming the layout.
- Red baker’s twine: Creates classic investigation-board connections.
- Reusable stencil letters: Keep case numbers and evidence labels visually consistent.
10. Create a Giant Jack-o’-Lantern Face
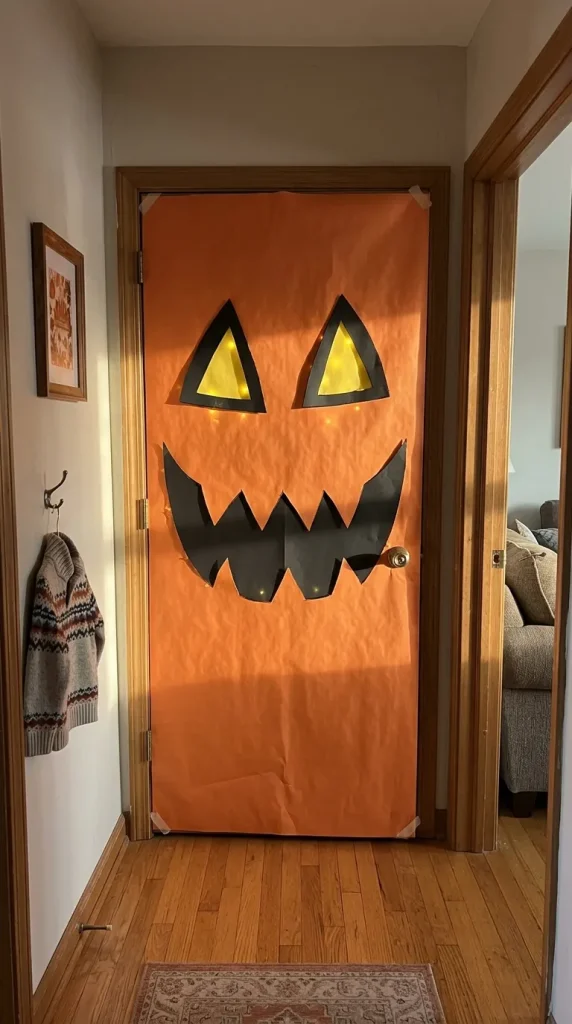
Simple can absolutely compete with elaborate when the graphic impact is strong.
Cover the whole door in orange paper or removable material. Add enormous black triangular eyes and a dramatic carved-pumpkin mouth that stretches nearly edge to edge.
But give it dimension.
Place yellow translucent paper behind openings in a raised black facial layer. Hide battery lights behind selected areas so the eyes and mouth appear illuminated.
This concept works particularly well from the far end of a hallway because the design remains readable at a glance.
Nice finishing touches
- Yellow vellum sheets: Produce a softer faux candle-glow effect behind facial openings.
- Low-profile LED fairy lights: Add illumination without bulky fixtures.
- Double-sided foam tape: Raises the facial layer enough to create subtle depth.
11. Make a Creepy Dollhouse Door
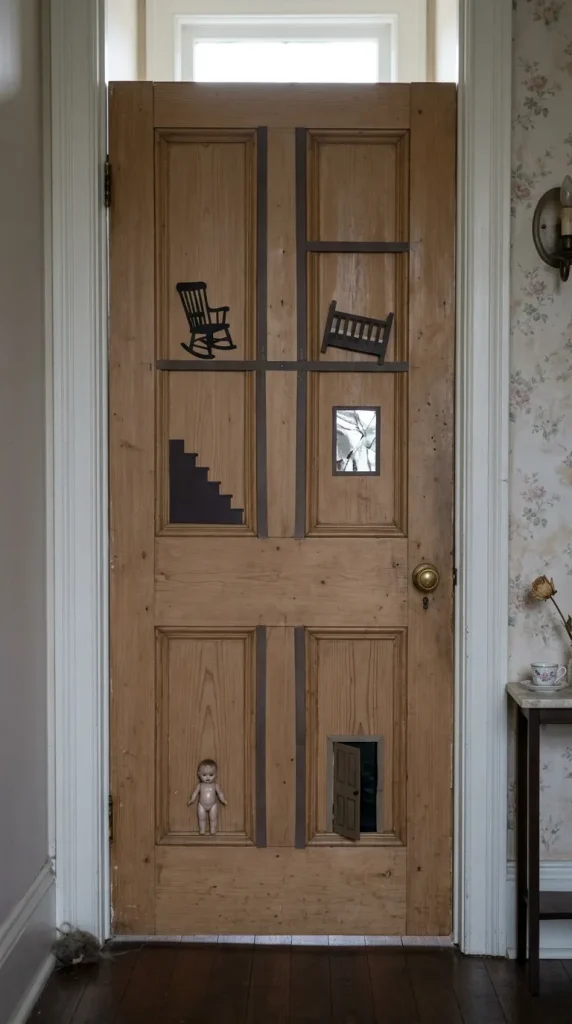
This one can become genuinely unsettling without requiring complicated construction.
Divide the door visually into several miniature dollhouse rooms using narrow cardstock strips. Each room gets its own tiny scene: an empty rocking chair silhouette, crooked nursery crib, dark staircase, broken mirror, or doll staring toward the viewer.
Keep the rooms small and detailed rather than filling each compartment with decorations.
One room should break the pattern. Perhaps its “door” hangs open into total darkness.
That single unexplained detail creates more tension than twenty plastic spiders.
A few complementary pieces
- Precision craft scissors: Helpful for tiny furniture and architectural silhouettes.
- Black cardstock: Creates crisp miniature furniture, railings, and figures.
- Mini adhesive dots: Secure small details without thick visible glue lines.
12. Create a Monster Laboratory Experiment
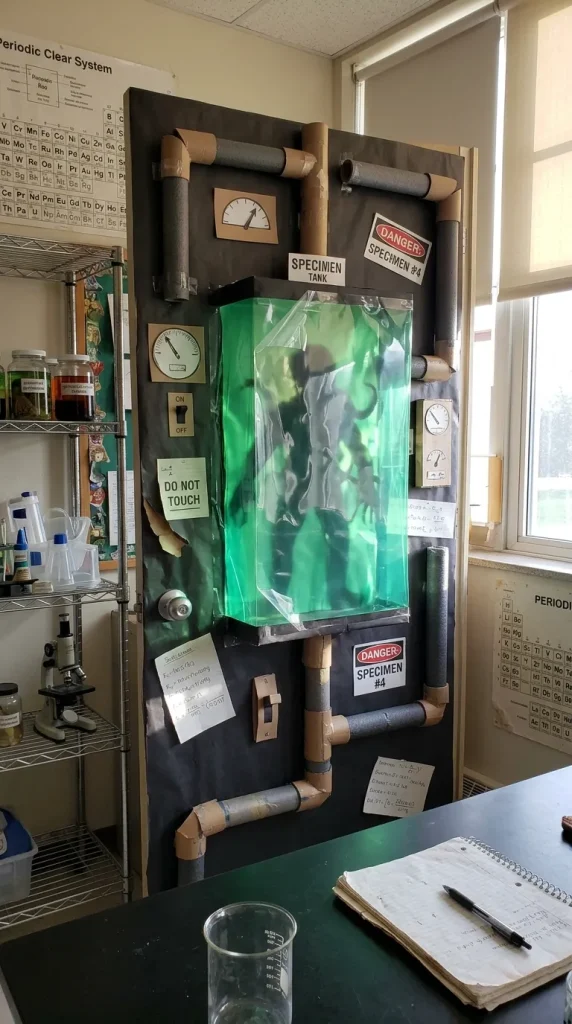
Think vintage science lab rather than generic Frankenstein poster.
Build a large central specimen tank from translucent green material, then place a dark creature silhouette inside it. Surround the tank with paper pipes, pressure gauges, switches, handwritten formulas, and warning labels.
You can make lightweight pipes from painted cardboard tubes cut lengthwise so they sit flat against the door.
The strongest composition puts the specimen front and center, with smaller laboratory details supporting it instead of competing for attention.
Possibly helpful picks
- Clear acetate sheets: Create a convincing transparent front for the containment tank.
- Flexible foam tubing: Makes lightweight pipes around the laboratory equipment.
- Silver paint pen: Adds bolts, gauge markings, metal seams, and mechanical details.
13. Build a “Don’t Open This Door” Creature Escape
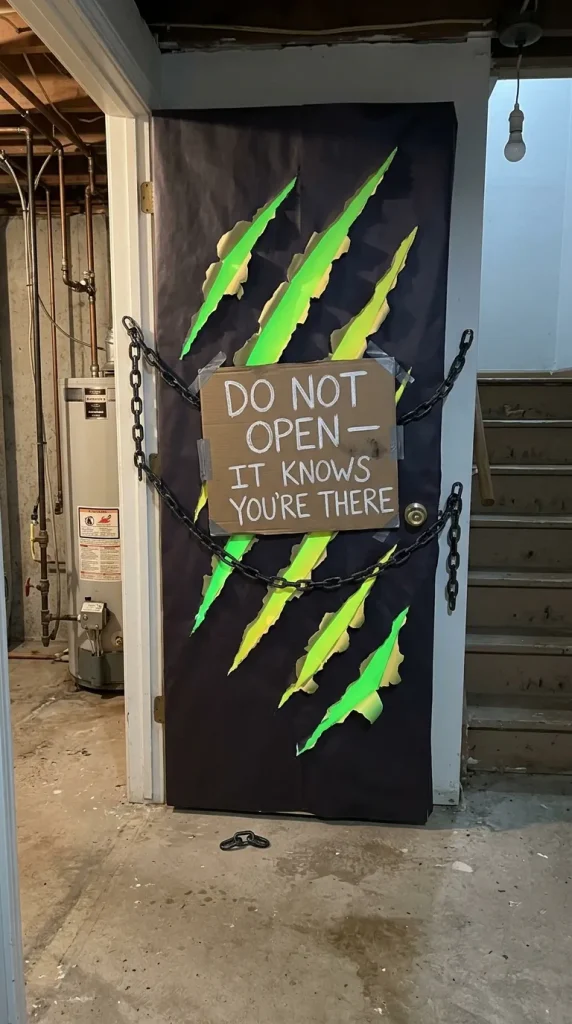
Sometimes suspense beats showing the monster.
Cover the door with dark paper and create several enormous claw marks ripping through the surface. Curl the paper edges outward around each tear so viewers see glowing green, red, or yellow underneath.
Then add chains crossing portions of the doorway and a large warning placard:
DO NOT OPEN — IT KNOWS YOU’RE THERE
You never actually show the creature.
That absence is the whole point.
Keep the chain lightweight and decorative, and never wrap anything around the functional handle or prevent the door from opening normally.
Worth considering
- Lightweight plastic chain: Creates the restrained-door illusion without heavy hardware.
- Fluorescent cardstock: Makes the torn openings appear strangely illuminated.
- White chalk marker: Gives black warning boards a convincing institutional look.
14. Make a Haunted Library Bookshelf
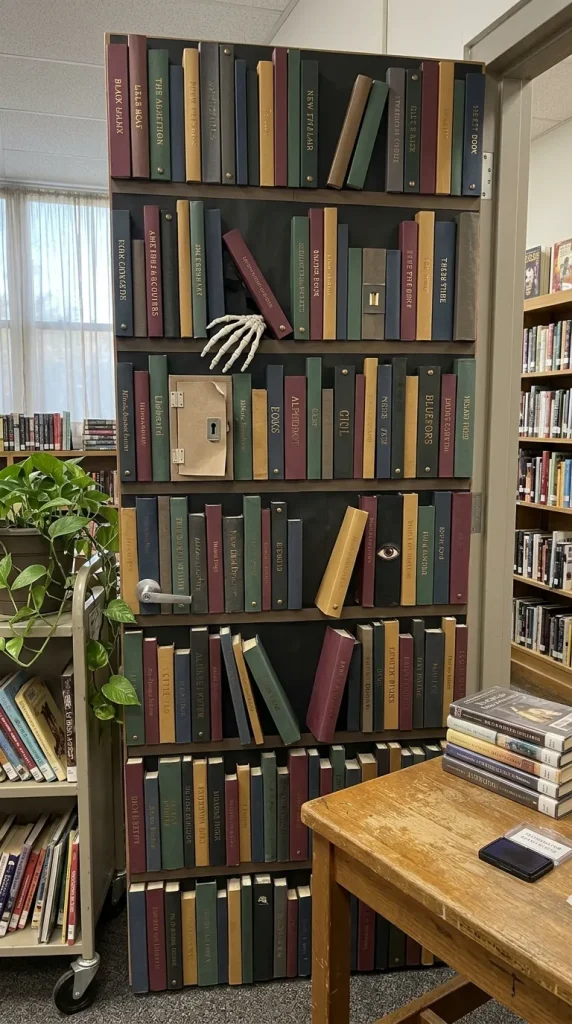
For schools, libraries, or offices full of book lovers, this can look surprisingly sophisticated.
Transform the door into a floor-to-ceiling supernatural bookshelf. Build rows of narrow book spines from cardstock, varying their height, thickness, and color.
Then hide strange things among them.
A skeletal hand reaches between two books. One shelf contains a tiny locked compartment. Another book has an eye instead of a title. A few volumes lean outward as though something behind them is pushing through.
Don’t create hundreds of individual books. Several well-designed clusters with dark negative space look far stronger.
Helpful accessories
- Metallic alphabet stickers: Create convincing aged book titles without hand-lettering everything.
- Corner-rounder paper punch: Gives homemade book spines a cleaner finished edge.
- Bronze brads: Add tiny faux hardware to secret compartments and book clasps.
15. Create a Black-and-White Haunted Cartoon Door
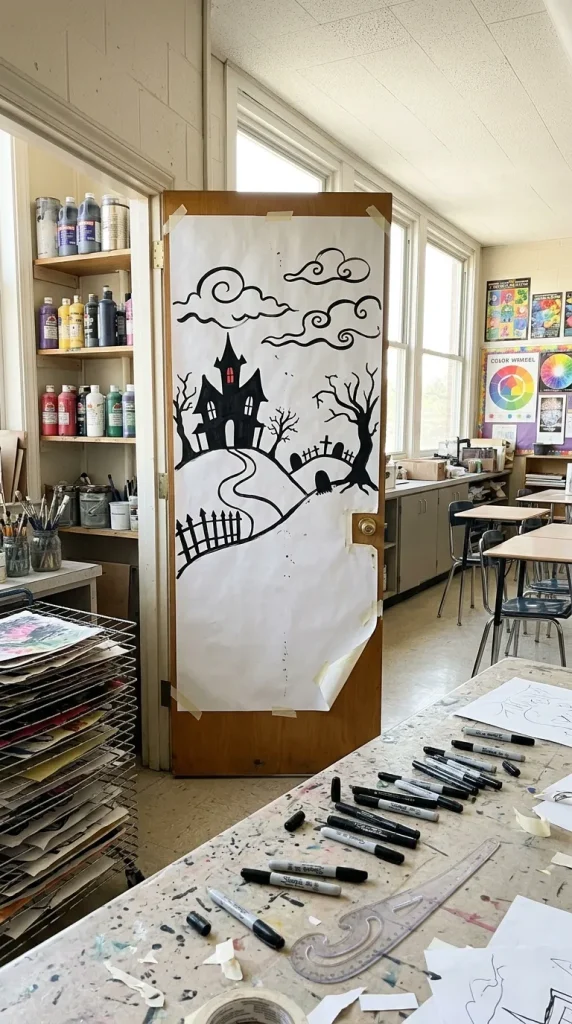
Most Halloween doors compete using orange, purple, and green. Going almost completely black and white immediately changes the visual rhythm.
Create a hand-drawn haunted landscape across the entire surface: crooked mansion, curling hill, bare trees, moon, cemetery fence, and exaggerated clouds.
Use bold black silhouettes against a white or pale-gray background.
Then add only one accent color, such as a tiny red window or glowing yellow moon.
The limited palette makes the composition feel more like an illustration than a pile of decorations. It also works wonderfully when your budget mostly consists of paper and patience.
A few designer picks
- Wide black paint markers: Speed up large silhouette work and keep edges bold.
- White heavyweight poster paper: Provides a cleaner drawing surface than thin copier paper.
- French curve ruler set: Helps create exaggerated hills, branches, roofs, and swirling shapes.
16. Build a Halloween Carnival Ticket Booth
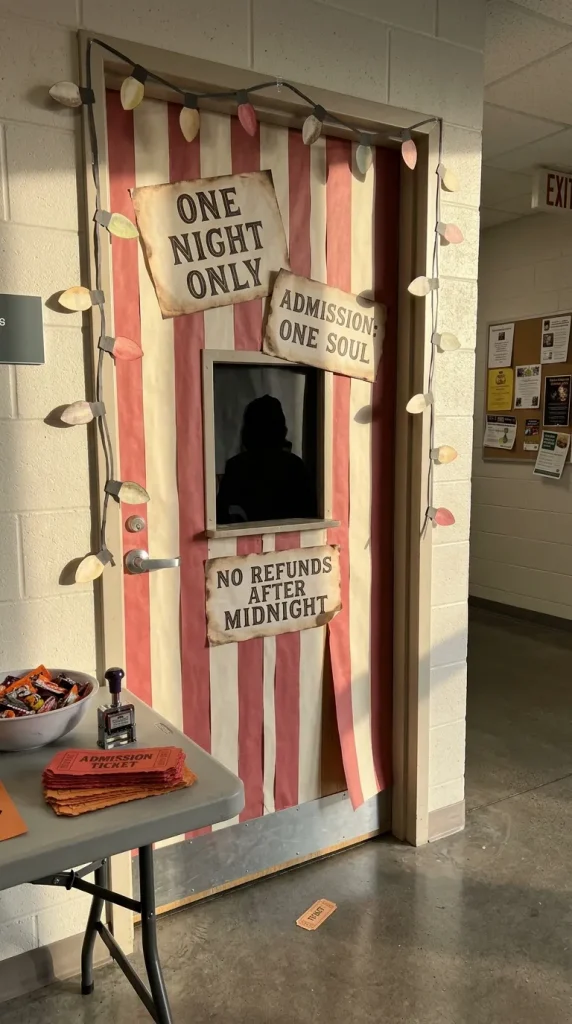
Finish with something playful and completely different from the horror-heavy concepts.
Turn your doorway into an abandoned Halloween carnival ticket booth. Frame the door with alternating faded red and cream stripes, then add a ticket window, vintage lettering, admission prices, and creepy carnival notices.
Instead of ordinary prices, try:
“ONE NIGHT ONLY”
“ADMISSION: ONE SOUL”
“NO REFUNDS AFTER MIDNIGHT”
Add strings of flat paper bulbs around the border and a mysterious silhouette sitting behind the ticket window.
Weather the edges lightly so everything feels old rather than party-store bright.
Some ideas to consider
- Distress ink pad: Quickly ages ticket signs and paper edges without messy paint.
- Number stamp set: Gives admission tickets and booth signage an authentic printed feel.
- Paper crimper: Adds texture to handmade tickets, trim, and carnival details.
A Few Contest Details That Make Any Door Better
No matter which Halloween door contest idea you choose, clarity beats quantity. People should understand the concept before they start examining the smaller details.
Build around one dominant focal point, then add secondary discoveries.
Also think about viewing distance. A beautifully detailed bottle label won’t rescue a design that looks confusing from ten feet away. Strong silhouettes, large shapes, intentional contrast, and controlled color usually photograph better too.
For temporary installations, always test adhesives somewhere inconspicuous first. Products intended for temporary decorating can help reduce cleanup, but suitability still depends on the actual door finish and manufacturer instructions.
Most importantly, don’t sacrifice safety for one extra contest vote. Keep handles, latches, exits, and necessary visibility unobstructed. Avoid open flames around paper, fabric, dried materials, and other combustible decorations; the NFPA specifically recommends battery-operated candles or glow sticks for Halloween displays.
Final Thoughts
The best Halloween door contest ideas don’t necessarily have the biggest budget or the most decorations. They have a concept people recognize immediately—and then enough clever details to make them come back for another look.
If you want dramatic, the monster mouth, boarded haunted house, or containment chamber can completely transform an ordinary doorway. If you’d rather create something clever, the Halloween crime scene or carnival ticket booth gives you plenty of room for personalized jokes. And if you’re chasing a more artistic result, I’d seriously consider the black-and-white haunted illustration or ghost portrait gallery.
My favorite approach is to choose one memorable visual trick and build everything around it. A mysterious gap between elevator doors can do more than fifteen unrelated decorations fighting for attention.
Pick the idea that suits your space, budget, and available crafting time first. Then give it one detail nobody expects.
That’s usually the part people remember when voting starts.

William Martin is a passionate bowler who spends most of his weekends playing the sport. With years of intense experience under his belt, William decided to share his knowledge by creating BOWLING OCEAN. Join me on this journey to explore the world of bowling and discover the tips and tricks to becoming a pro.