
15 Pumpkin Decorating Ideas for Contest Winners
A pumpkin decorating contest starts innocently enough. Someone puts a pumpkin on the table, someone else grabs paint, and five minutes later everybody realizes they suddenly care a lot about winning.
The tricky part isn’t decorating a pumpkin. It’s coming up with an idea that looks different from the other entries while still feeling realistic enough to make at home.
That distinction matters. Current contest rubrics often reward originality, craftsmanship, visual impact, and overall presentation, while some competitions also restrict carving, materials, size, or even the type of pumpkin contestants can use.
That’s why I wouldn’t start with supplies. Start with the concept.
A strong contest pumpkin should make someone understand the idea quickly, then notice the clever details when they look closer. The fifteen pumpkin decorating ideas for contest entries below take different creative directions, from miniature scenes and optical illusions to elegant mixed-media designs and genuinely funny transformations.
1. Turn the Pumpkin Into a Tiny Bookshop
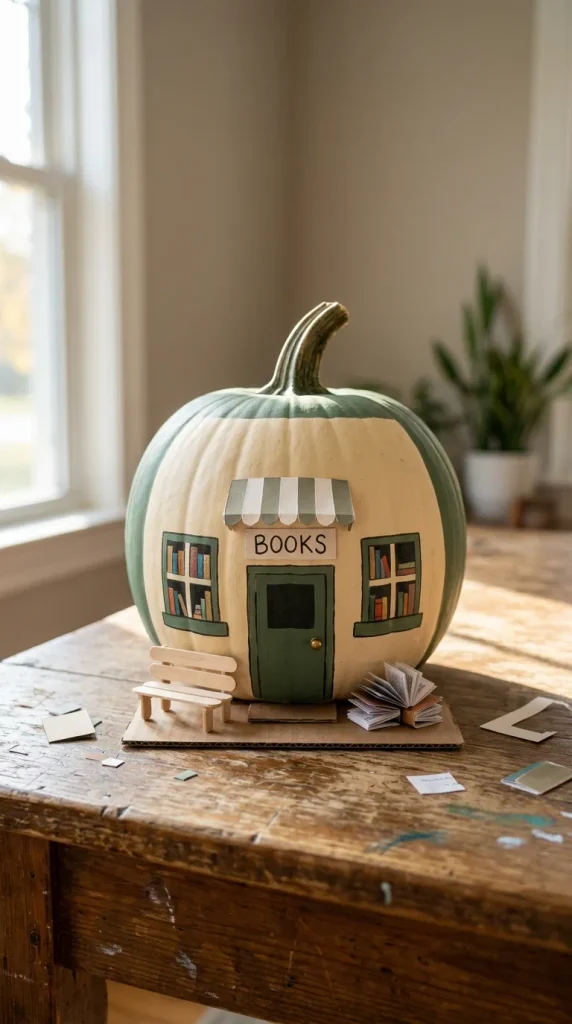
Instead of decorating a pumpkin with a character, turn the entire pumpkin into a miniature storefront.
Paint the pumpkin a warm cream, brown, or muted green, then create a tiny shop facade across the front. Add a miniature awning, a small door, painted windows, and a few tiny “books” made from folded cardstock.
The pumpkin’s natural roundness actually helps here. It can look like a cozy little building rather than a decorated vegetable.
For the contest, the details matter. Add a tiny sidewalk made from cardboard, a miniature bench, or a stack of tiny books outside the entrance. Keep the colors coordinated so the scene looks intentional rather than like a collection of craft supplies glued together.
This idea works particularly well when judges can walk around the entry. Continue some details around the sides instead of decorating only the front.
A few things you might like
- Acrylic craft paint: Creates the solid base colors needed for the storefront.
- Fine-detail paintbrush set: Helps with windows, trim, signs, and other tiny architectural details.
- Miniature wooden craft pieces: Give the shop facade believable doors, shutters, or trim.
2. Create a Pumpkin With a 3D Hot-Air Balloon Illusion
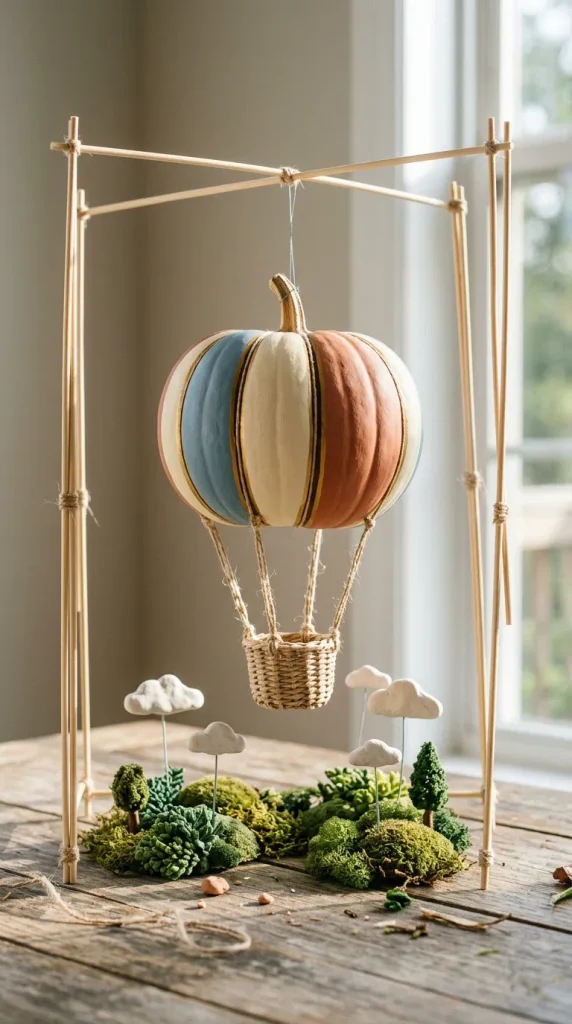
This design turns the pumpkin into the balloon portion of a miniature hot-air balloon.
Paint the pumpkin in alternating panels of cream, dusty blue, terracotta, or another coordinated palette. Add thin decorative lines between the panels, then suspend a tiny basket underneath using strong cord.
The clever part comes from the supporting scene. Add miniature clouds, tiny bunting, or a small landscape underneath so the pumpkin looks like it has actually floated into the scene.
Don’t overload it with accessories. The balloon should remain the obvious focal point.
A stable base also matters. If the basket hangs too heavily, the pumpkin can tip or the entire structure can become difficult to transport.
Possibly handy products
- Air-dry modeling clay: Useful for creating tiny clouds, baskets, or landscape details.
- Strong craft cord: Supports the suspended basket and decorative elements.
- Mini wooden dowels: Provide a lightweight framework for stabilizing the display.
3. Make a Pumpkin With a Mosaic Surface
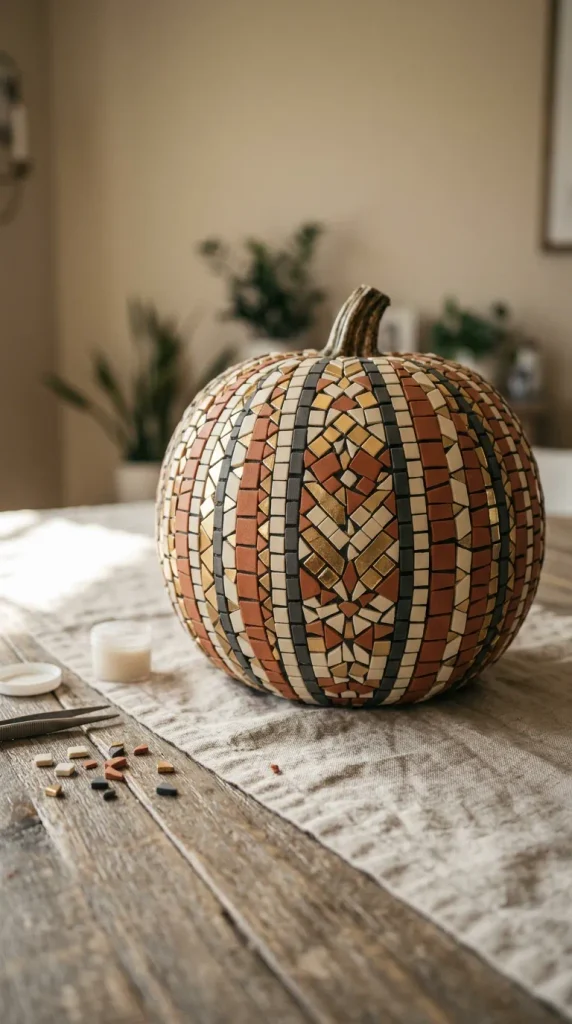
For something more artistic, cover the pumpkin in a carefully planned mosaic.
You can use small pieces of colored craft foam, lightweight tiles, paper shapes, or other suitable materials. Arrange them into a geometric pattern rather than scattering them randomly.
A limited palette will make a huge difference. Try cream, rust, charcoal, and metallic gold, or choose jewel tones if the contest welcomes brighter designs.
Work in sections and allow adhesive to set before moving the pumpkin. The biggest mistake with mosaic-style designs involves rushing the placement and ending up with uneven gaps.
A clean mosaic can score well because it combines visual impact with craftsmanship, two qualities that several contest rubrics specifically evaluate.
Give these a look
- Self-adhesive mosaic sheets: Make small-scale pattern work easier without handling individual pieces.
- Precision craft scissors: Help create consistently sized geometric pieces.
- Clear craft adhesive: Secures lightweight decorative pieces without visually overpowering the design.
4. Design a Vintage Floral Decoupage Pumpkin
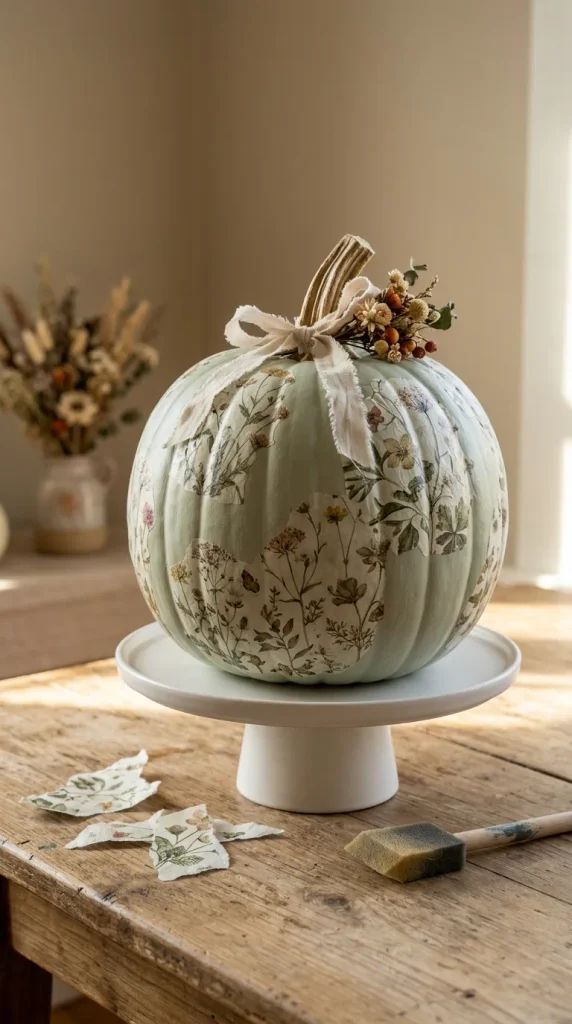
This one takes a completely different direction: make the pumpkin look like an old-fashioned botanical artwork.
Start with a smooth cream or pale sage base. Apply pieces of floral paper or decorative napkins over selected sections, allowing some of the painted surface to remain visible.
Don’t cover every inch.
Leaving intentional negative space gives the pumpkin a more sophisticated appearance and prevents the design from looking like wallpaper wrapped around a gourd.
Finish around the stem with a narrow ribbon or a small cluster of dried decorative elements. If your contest permits decoupage materials, this approach can create a surprisingly polished entry without complicated carving.
Nice finishing touches
- Matte decoupage medium: Helps attach decorative paper and creates a unified surface.
- Botanical-print paper napkins: Provide detailed floral artwork without requiring hand painting.
- Soft artist sponge brushes: Spread decoupage medium smoothly over curved sections.
5. Build a Miniature Pumpkin Farmers’ Market
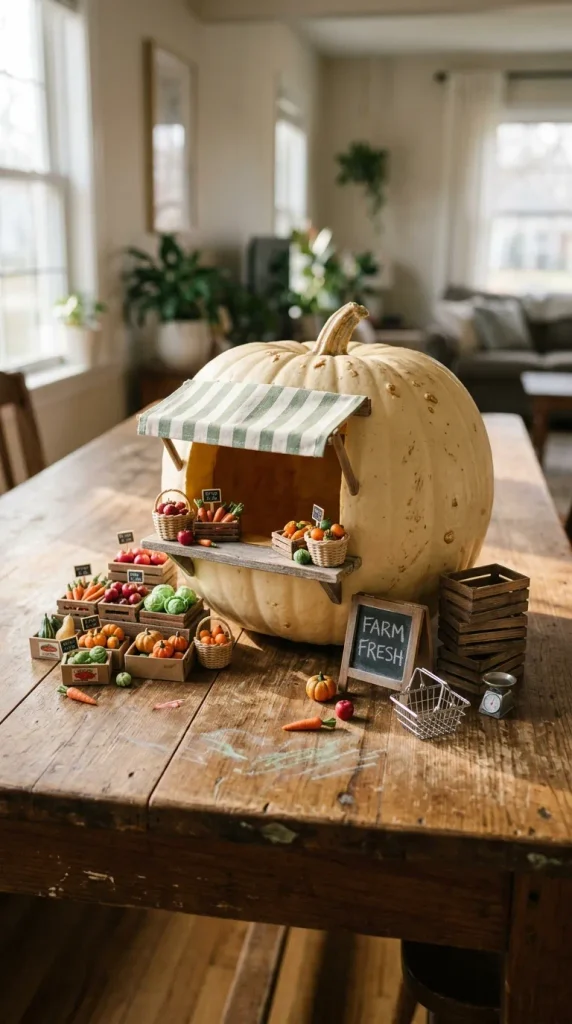
Here’s a fun one if you enjoy miniature scenes.
Turn the pumpkin into the centerpiece of a tiny farmers’ market stall. Paint a small counter across the front, add a striped awning, and create miniature baskets filled with tiny faux produce.
The concept works because the pumpkin becomes the building, not merely the decoration.
Add a tiny chalkboard-style sign, miniature crates, and perhaps a little shopping basket beside the stall. You don’t need readable text on every accessory; recognizable shapes will communicate the idea more effectively.
Keep the footprint compact so the display remains easy to transport.
Helpful additions
- Mini wooden crates: Create instant market-stall structure and display height.
- Miniature woven baskets: Add realistic texture to the tiny produce display.
- Small chalkboard: Provides a natural-looking sign element for the market concept.
6. Make an Optical-Illusion “Pumpkin Within a Pumpkin”
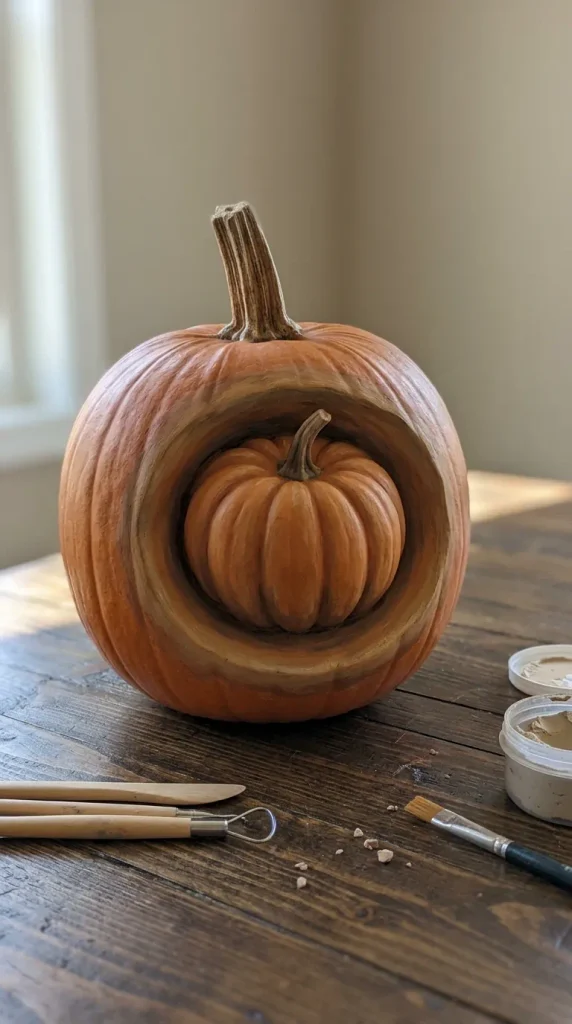
This design aims for the double-take.
Create the appearance of a smaller pumpkin emerging from the surface of a larger pumpkin without relying on an actual second pumpkin sitting beside it. You can use lightweight sculpting material to build the smaller form and blend its edges into the painted surface.
Use shadows and contrasting colors to make the smaller pumpkin appear recessed or raised.
This idea requires more patience than a basic painted design, but it offers something extremely valuable in a contest: a moment of surprise.
Test the illusion from several angles before finishing it. If it only works from one exact viewpoint, adjust the shapes until the effect survives a casual walk-by.
A few designer picks
- Lightweight air-dry clay: Lets you build raised forms without adding excessive weight.
- Sculpting tool set: Helps shape and smooth the transition between forms.
- Small blending brushes: Useful for adding shadows that strengthen the illusion.
7. Turn the Pumpkin Into a Giant Cup of Hot Cocoa
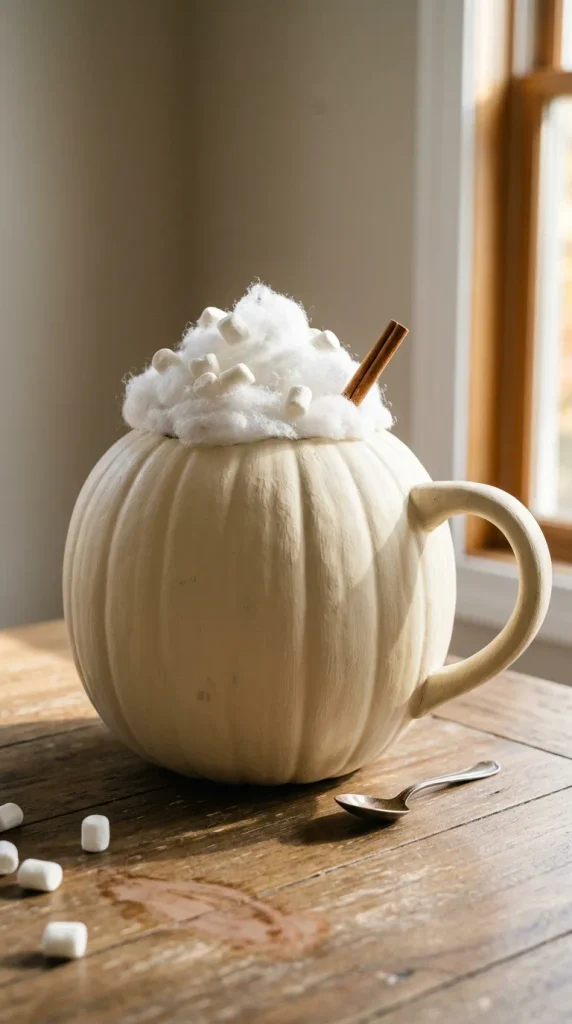
Rather than creating a standard Halloween character, transform the pumpkin into something people recognize immediately: a cozy fall drink.
Paint the pumpkin like a ceramic mug, using a warm cream, brown, or deep red palette. Build a large handle from lightweight cardboard, foam board, or another suitable material.
Then create a whipped-cream effect on top using lightweight craft materials.
Add miniature marshmallows, cinnamon-stick details, or a tiny spoon around the base.
The strongest version keeps the palette restrained. Too many toppings, colors, and accessories can make the pumpkin look more like a craft-store explosion than a convincing cup.
Useful items to consider
- Foam board: Provides a lightweight material for constructing the oversized mug handle.
- White fiberfill: Creates a convincing whipped-cream texture.
- Craft foam sheets: Useful for small decorative details and lettering-free cup accents.
8. Create a Galaxy Pumpkin
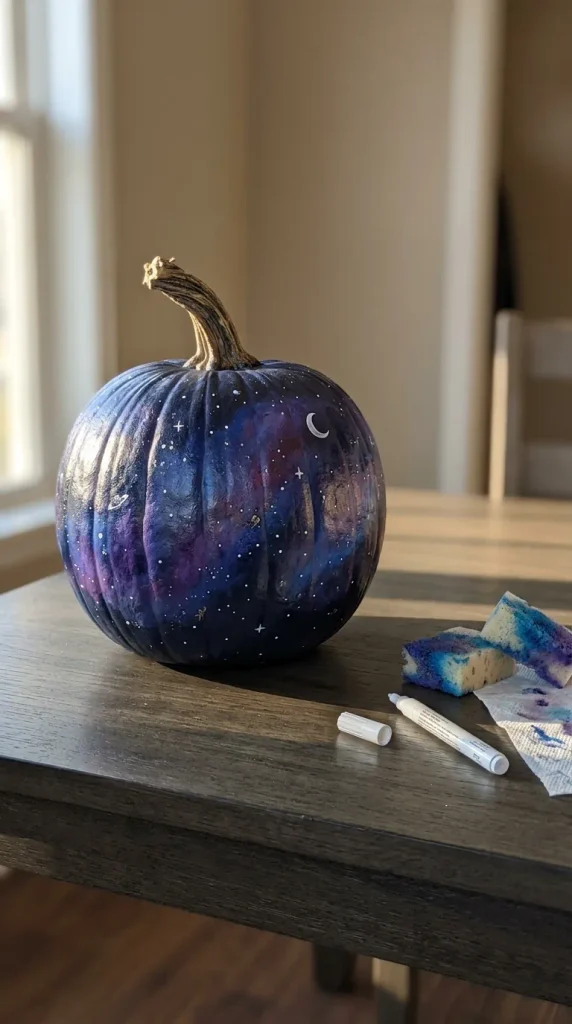
For maximum color impact, turn the pumpkin into a deep-space scene.
Paint the entire surface dark navy, charcoal, or black. Blend lighter blue and purple tones into the background, then add tiny stars and a few larger celestial shapes.
The trick lies in the blending.
A galaxy effect looks much more convincing when you build several translucent layers instead of applying one flat purple color. Add small white dots sparingly rather than covering the entire pumpkin with stars.
For a contest, consider creating one clear focal point, such as a crescent moon or a small painted constellation.
Possibly helpful picks
- Blending sponge set: Helps soften transitions between galaxy colors.
- Metallic acrylic paint: Adds subtle celestial highlights without requiring loose glitter.
- Fine white paint pen: Makes tiny stars and precise details easier to control.
9. Give the Pumpkin a Sculptural Fabric Wrap
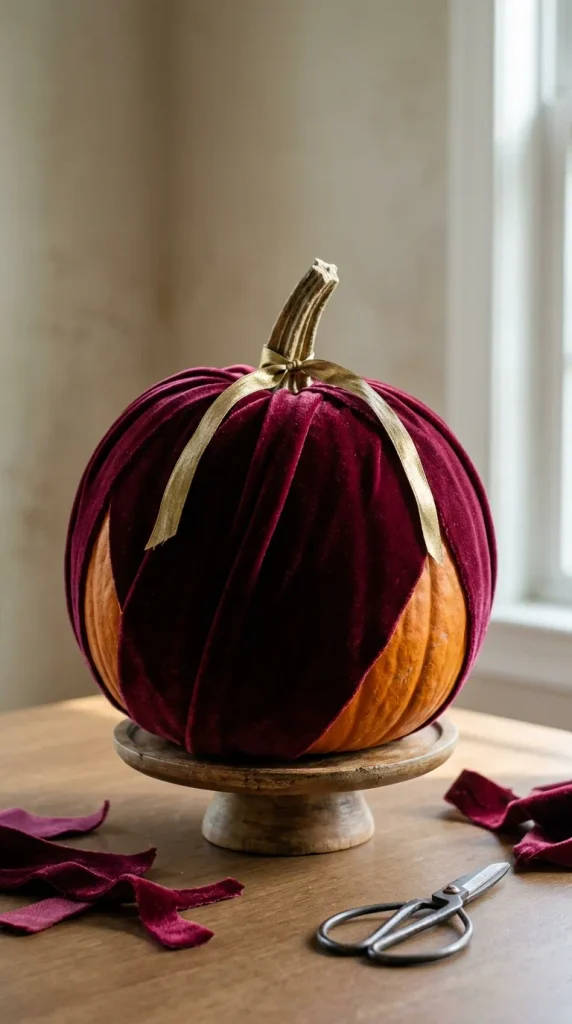
Skip paint entirely and use fabric as the main material.
Choose one beautiful fabric, such as velvet, linen, burlap, or patterned cotton, and wrap selected sections of the pumpkin while leaving enough of its original shape visible.
Instead of simply covering the pumpkin, follow its natural ridges. Secure the fabric carefully so the lines look deliberate.
A rich burgundy velvet pumpkin with a narrow metallic ribbon can look dramatically different from the typical painted entry.
This idea suits contests that allow mixed materials and reward presentation. Some competitions specifically permit fabric, ribbons, and attached materials, while others limit entries to paint or prohibit puncturing the pumpkin, so always check the rules first.
Practical extras
- Decorative velvet fabric: Provides rich texture and immediately changes the pumpkin’s appearance.
- Fabric scissors: Make clean cuts around curved sections.
- Strong double-sided craft tape: Helps hold lightweight fabric in place without visible glue marks.
10. Create a Pumpkin Diorama With a Tiny Fall Scene
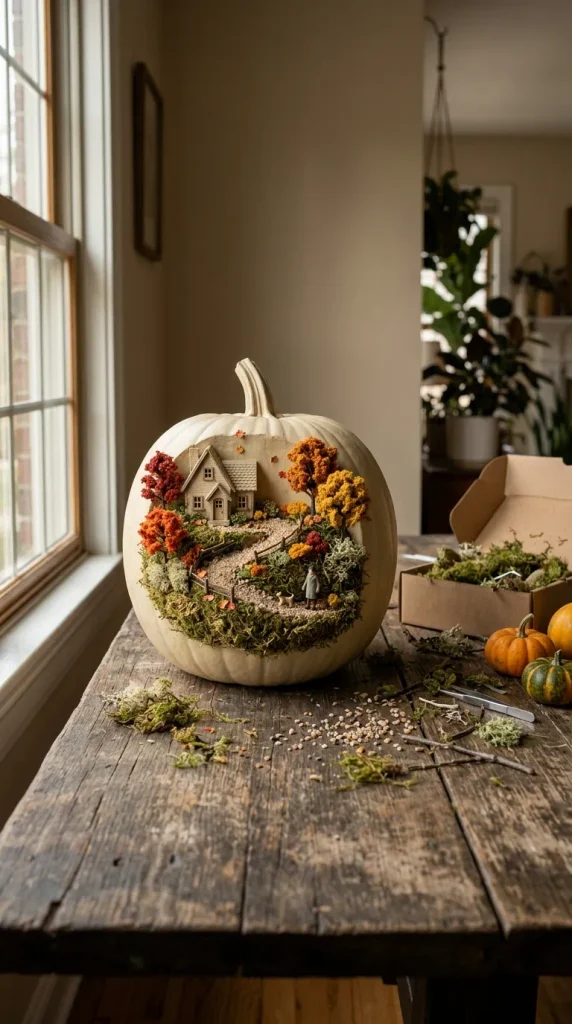
Imagine looking at the pumpkin and discovering an entire miniature autumn world on its surface.
You can build a small scene on the front or create a partial open section if the contest permits cutting. Think tiny cottage, winding path, miniature trees, and a few autumn details.
For a no-carve version, create the diorama directly on the exterior using miniature materials.
The most important design principle here is scale consistency. A tiny house next to an enormous tree immediately breaks the illusion.
Keep the scene simple enough that the judge can understand it from several feet away, then reward closer inspection with tiny details.
Worth considering
- Miniature model trees: Establish the scale of the scene quickly.
- Craft moss: Adds ground texture around tiny structures.
- Miniature figurines: Give the scene a sense of story and activity.
11. Turn the Pumpkin Into a Friendly Robot
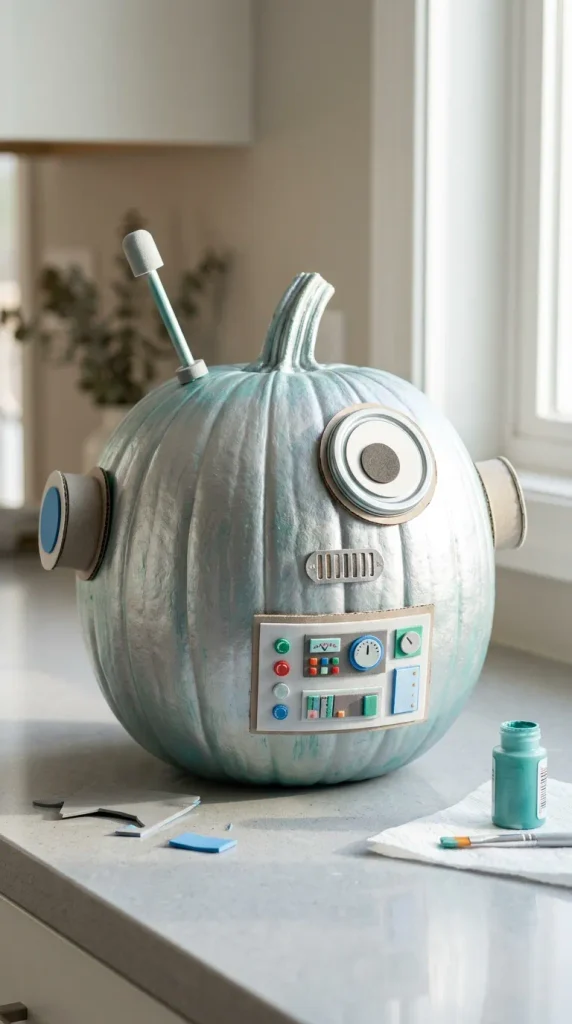
A robot pumpkin gives you strong shapes, recognizable features, and plenty of room for personality.
Paint the pumpkin metallic silver, soft gray, or even an unexpected color such as teal. Add cardboard or foam shapes for ears, panels, buttons, and antennae.
Instead of covering the pumpkin with random mechanical details, establish a clear face and body first.
The best version might have one oversized feature—a large circular eye, a prominent control panel, or an unusual antenna shape—that makes the character recognizable instantly.
For school or family contests, you can simplify the construction considerably. Current school contest guidance often favors clear concepts that remain manageable for the entrant’s age and skill level.
You might like
- Metallic acrylic paint: Creates the robot’s main surface finish.
- Self-adhesive foam sheets: Make lightweight geometric panels easy to add.
- Googly eyes: Provide an intentionally playful character element.
12. Make a Pumpkin Look Like a Stained-Glass Window
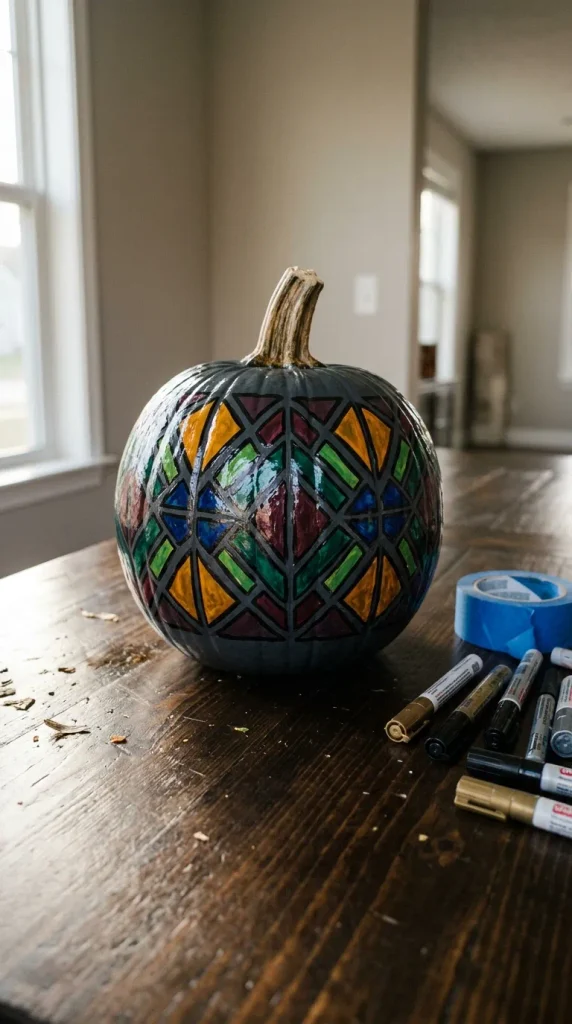
This is a beautiful choice when you want something artistic rather than cartoonish.
Paint the pumpkin a deep background color, then create sweeping geometric lines across its ridges. Fill the sections with jewel-toned colors such as amber, emerald, sapphire, and burgundy.
You don’t need actual glass. The illusion comes from the black or dark outlines separating the colored sections.
Keep the shapes bold enough to read from a distance. Tiny geometric fragments may look impressive up close but disappear during judging.
A glossy finish can enhance the glass-like appearance, provided your contest rules permit the coating.
Helpful accessories
- Paint marker set: Makes crisp outlines easier than using a very fine brush alone.
- Gloss acrylic sealer: Adds surface shine after the paint fully dries.
- Painter’s masking tape: Helps create clean geometric edges during painting.
13. Build a Pumpkin “Food Truck”
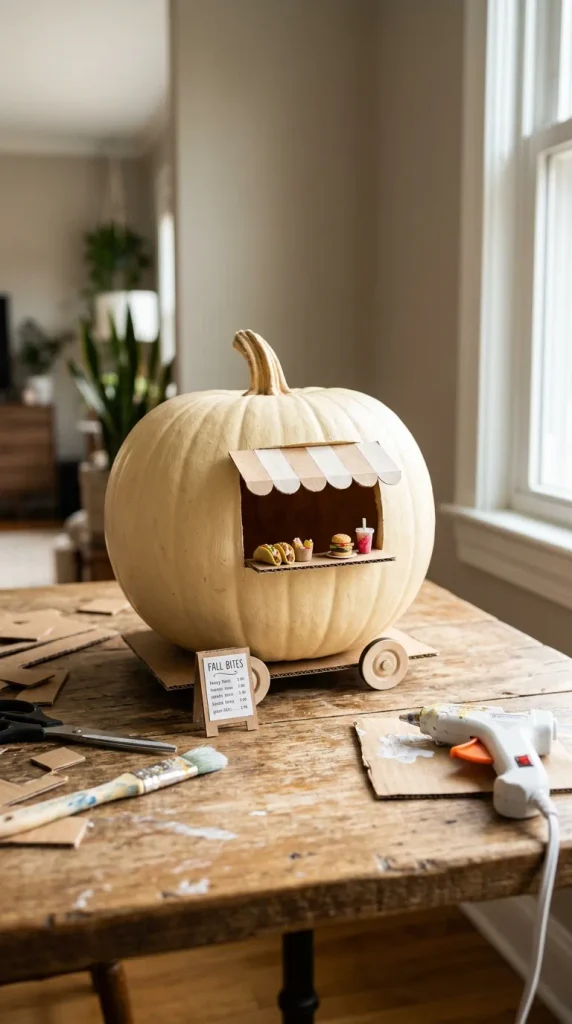
This one is almost guaranteed to get people smiling.
Turn the pumpkin into a miniature food truck with a painted service window, tiny wheels, an awning, and a few miniature food props.
Choose one food concept rather than trying to represent an entire restaurant. A tiny taco truck, bakery van, coffee cart, or ice-cream truck gives the design a clear identity.
Add a miniature menu board, but don’t rely on lots of tiny lettering. The shape, colors, and props should communicate the concept even when someone stands several feet away.
A stable cardboard base underneath can make the entire truck easier to move.
A few relevant products
- Lightweight cardboard sheets: Form the truck’s awning, wheels, and structural additions.
- Mini wooden wheels: Add a convincing vehicle detail without much weight.
- Craft glue gun: Makes quick assembly of lightweight decorative components easier.
14. Create an Elegant Gold-Leaf Pumpkin
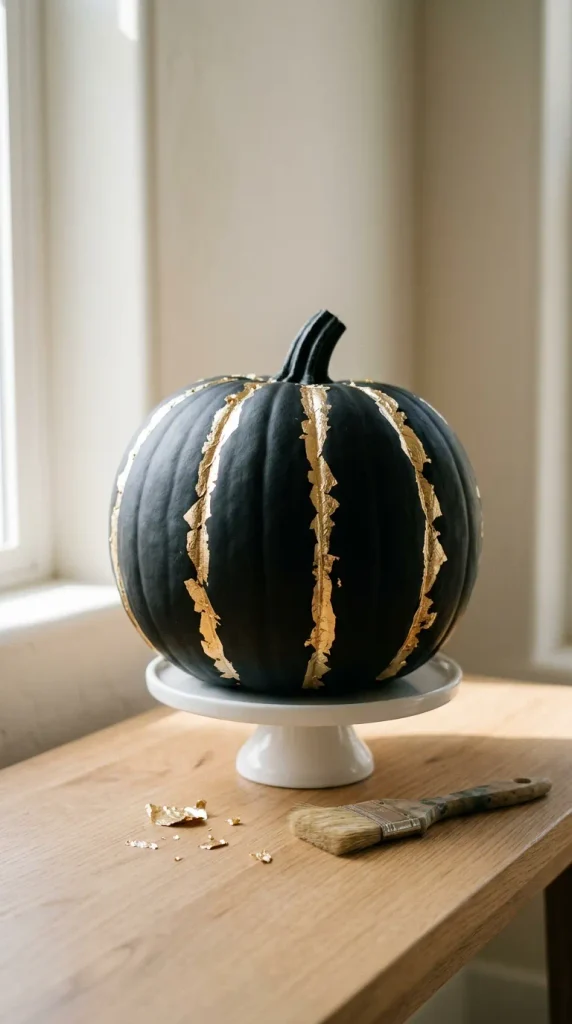
If your contest has an adult or decorative-art category, this direction can look incredibly polished.
Paint the pumpkin in matte black, cream, deep green, or charcoal. Then apply small sections of metallic gold leaf rather than covering the entire surface.
Follow a few of the pumpkin’s natural ridges with the metallic accents. The contrast between the matte base and reflective gold creates visual interest without requiring a complicated design.
Keep the surrounding display quiet. A simple pedestal or neutral surface will make the pumpkin itself look more intentional.
Gold-leaf techniques can become messy, so work on a protected surface and give the adhesive and finish adequate drying time.
A few favorites
- Gold-leaf sheets: Create reflective metallic accents that paint alone cannot replicate.
- Gilding adhesive: Helps attach metallic leaf to selected areas.
- Soft gilding brush: Allows you to press and smooth delicate leaf without scratching the finish.
15. Make a Pumpkin With a Moving Mechanical Theme
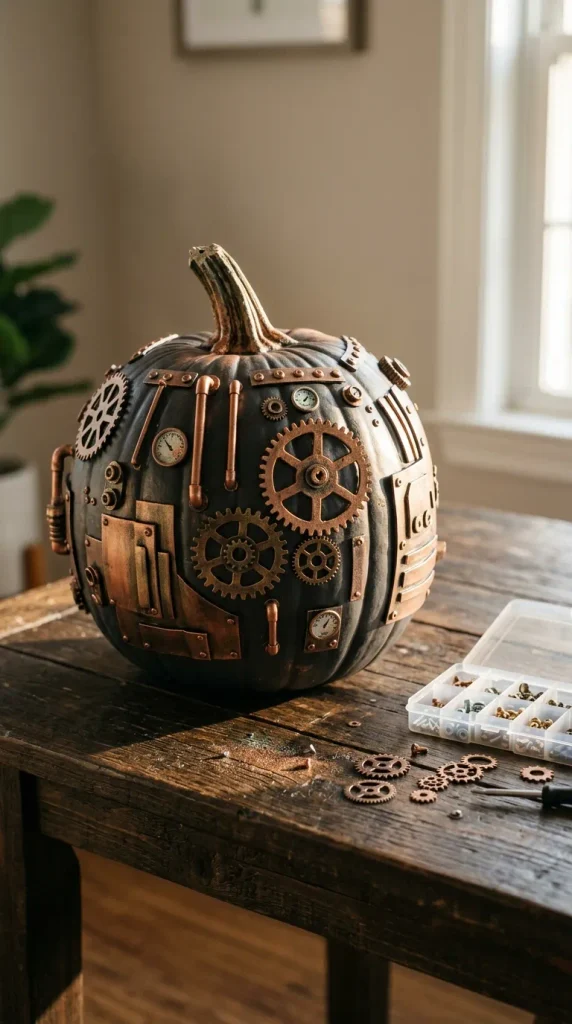
For the contestant who really wants to make judges stop, create the illusion of a mechanical machine.
Paint the pumpkin in charcoal, copper, bronze, or muted metallic colors. Add faux gears, small pipes, bolts, gauges, and layered panels around the surface.
The goal isn’t to make an actual functioning machine. The pumpkin should simply look like it belongs inside a whimsical workshop.
Create depth by layering pieces at different heights. A few larger gears will usually create more impact than dozens of tiny ones.
If the contest judges the entry from all sides, continue the mechanical details around the back. A spectacular front with a completely unfinished rear can hurt the overall presentation score.
Helpful additions
- Assorted craft gears: Establish the mechanical theme immediately.
- Metallic wax rub: Adds aged highlights to raised decorative pieces.
- Miniature hardware embellishments: Give panels and faux machinery convincing detail.
How to Make Your Contest Pumpkin Stand Out
A clever concept gives you the starting advantage, but execution can decide the result.
Several real contest rubrics use categories such as creativity, originality, craftsmanship, visual impact, theme execution, and presentation.
That suggests a simple strategy: don’t spend all your time making the idea complicated.
Spend some of your time making it clean.
Start with one unmistakable concept
If someone needs a paragraph of explanation before they understand your pumpkin, simplify it.
A miniature bookshop should look like a bookshop. A robot should look like a robot. A galaxy should immediately read as space.
Think about the silhouette
Before adding tiny decorations, step several feet away.
Does the basic shape still look interesting?
This matters because judges may see dozens of entries in a short period. A strong outline helps yours register quickly.
Finish the details judges can actually see
Hide visible glue strings. Clean up paint edges. Secure loose decorations. Remove fingerprints from glossy surfaces.
Those little things can separate an impressive concept from an unfinished-looking entry.
Check the contest rules before buying supplies
This one sounds obvious until you discover that your brilliant carved pumpkin violates a no-carving rule.
Some contests allow any decorating method, while others permit only paint, ban puncturing the pumpkin, restrict size, require artificial pumpkins, or prohibit open flames.
Even lighting rules vary. Some carving competitions specifically create lighting categories, while others require battery-operated illumination rather than candles.
Don’t ignore the back
If the judges can walk around the entry, treat the sides and back as part of the design.
You don’t necessarily need the same level of detail everywhere. Just avoid an obvious “front finished, back forgotten” situation.
Add a short title card
A small title can help judges understand an unusual concept without forcing you to explain it verbally.
Keep it short:
“The Little Pumpkin Bookshop”
or
“Autumn in Another Galaxy”
That’s enough.
Final Thoughts
The best pumpkin decorating ideas for contest entries don’t always involve the most expensive materials or the most complicated construction.
Often, the winning advantage comes from choosing a concept that feels fresh, then executing it with patience.
A miniature bookshop can beat a more elaborate pumpkin if the tiny details feel intentional. A beautifully painted galaxy can stand out more than a pumpkin covered in every craft supply imaginable. And a simple optical illusion can make people stop because they want to figure out how you made it work.
That’s the part I love about pumpkin contests: the pumpkin itself stays wonderfully ordinary. Your job is to make someone see it differently.
Before you start gluing, painting, or carving, decide what you want your pumpkin to be. Then build everything around that one idea.
And if you’re competing against serious crafters, remember one very useful rule: originality gets people to stop, but craftsmanship gives them a reason to keep looking.
Pick your favorite concept, give yourself enough drying and construction time, and don’t be afraid to keep the final design simpler than your first sketch. Sometimes the pumpkin with one really good idea is the one everyone remembers.

William Martin is a passionate bowler who spends most of his weekends playing the sport. With years of intense experience under his belt, William decided to share his knowledge by creating BOWLING OCEAN. Join me on this journey to explore the world of bowling and discover the tips and tricks to becoming a pro.