15 Raised Garden Bed with Arched Trellis Ideas
I still remember the first time I saw a raised garden bed with an arched trellis in a neighbor’s yard. I stopped mid-walk and just stared. Cucumbers were hanging down like green chandeliers. Bean vines were weaving through the curve. And underneath all that beauty, she was just sitting on a stool, snipping herbs in the shade of her own plants.
That image stayed with me for weeks.
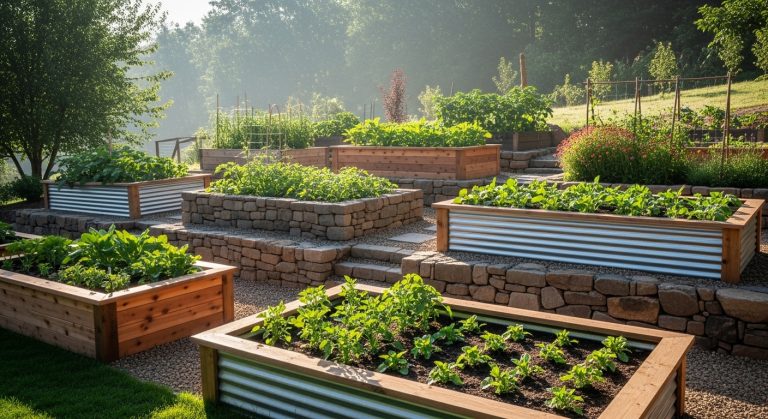
Here is the thing about raised beds with arched trellises. They are not just pretty faces. They double your growing space, create natural shade for heat-sensitive crops, and turn a basic vegetable patch into the kind of garden people actually want to hang out in. After building four of these myself and learning every mistake along the way, I am convinced this is the smartest upgrade any home gardener can make.
Let me show you exactly how to build, customize, and grow in a raised garden bed with an arched trellis using ideas that actually work in real backyards.
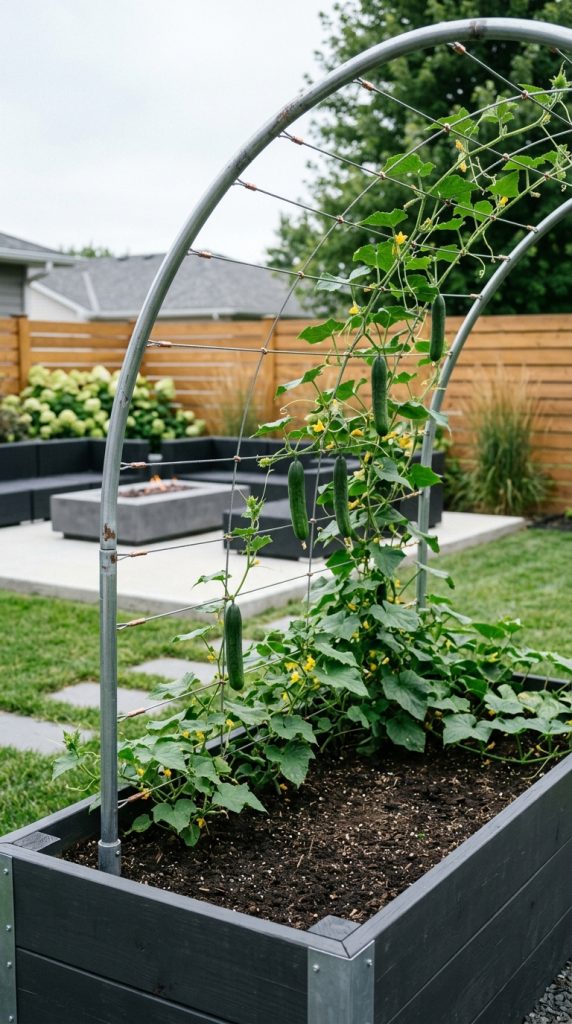
1. Cattle Panel Arch for Heavy Crops
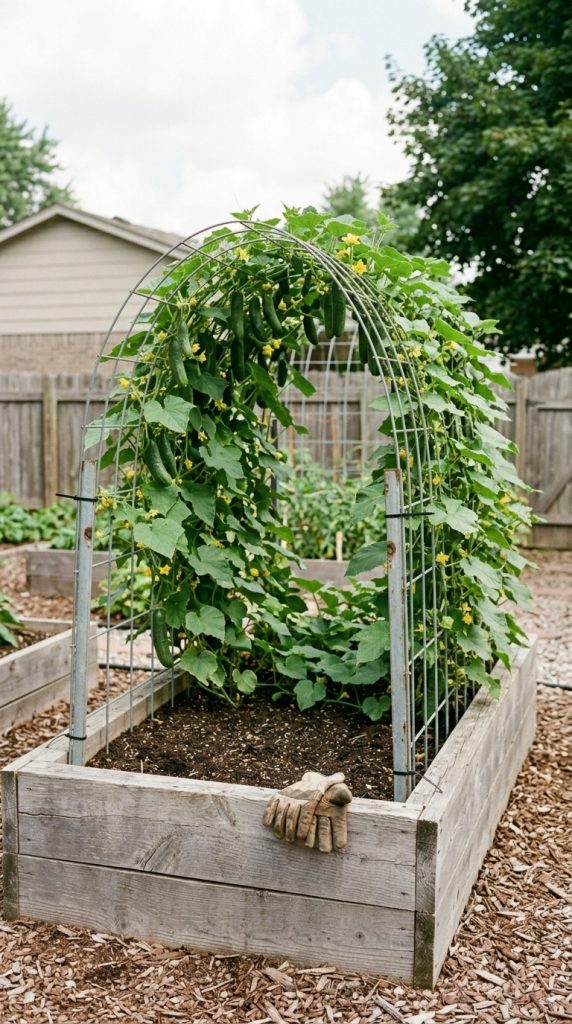
The first arched trellis I ever built used cattle panels. These are heavy gauge wire panels sold at farm supply stores for, well, cattle. They cost about twenty-five dollars each and measure sixteen feet long by fifty inches wide. Bend one into an arch over a four-foot wide raised bed, and you have a structure that will not blink when you hang ten pounds of winter squash on it.
You will need two people to bend the panel without kinking it. Set your raised bed in place, then have each person grab one end of the panel and walk toward the center until it forms a natural arch. Secure the ends to the inside edges of the bed using heavy duty zip ties or fence staples.
Pros
- Holds massive weight without sagging or collapsing
- Lasts twenty years in outdoor conditions
- Costs less than wooden trellis kits
- Creates a tunnel effect kids love to play under
Cons
- Requires two people and some muscle to install
- Grid pattern is too wide for small peas or tiny beans
- Rusts eventually but stays structurally sound
Trust me on the two-person thing. I tried alone and ended up with a bent panel that looked more like a crumpled soda can than an arch.
2. PVC and Netting Budget Arch
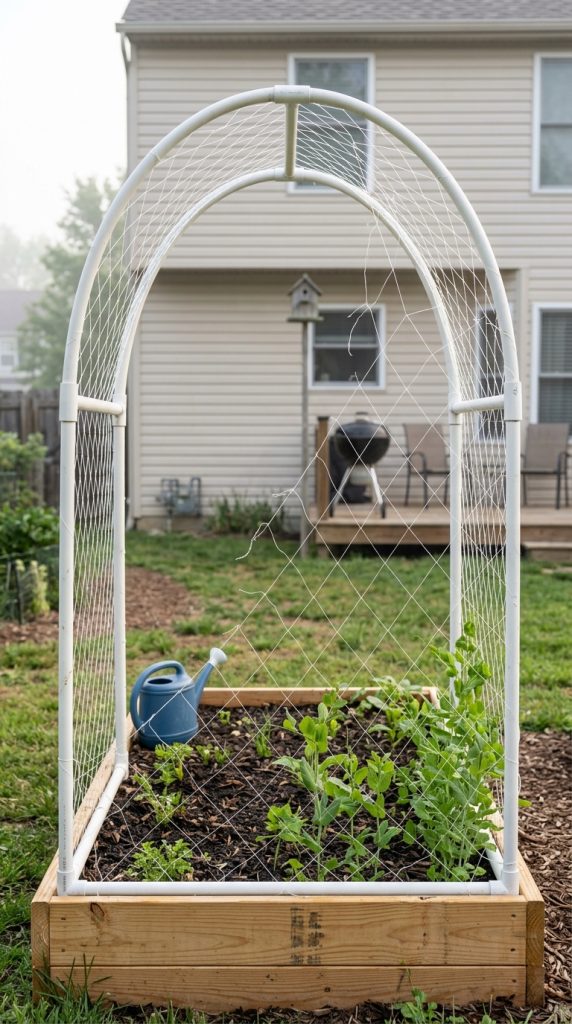
Not everyone wants to wrestle cattle panels. I get it. Here is the budget version that costs under fifteen dollars and takes thirty minutes. Buy ten feet of half-inch PVC pipe, four elbow joints, and a roll of plastic trellis netting. Cut the pipe into four two-foot sections and two three-foot sections. Assemble a rectangle, then arch the long pieces by inserting shorter uprights into your raised bed corners.
The trick is sliding the netting over the entire PVC frame like a sleeve. This creates a soft, flexible arch that works beautifully for lightweight crops like cucumbers, small melons, and peas. You can lift the whole thing off the bed at the end of the season and store it flat.
Pros
- Extremely beginner friendly with no power tools required
- Fits any size raised bed because you customize the cuts
- Plastic netting won’t rust or rot
- Stores completely flat in a garden shed
Cons
- PVC can become brittle after a few years of sun exposure
- Not strong enough for heavy fruiting crops
- High winds can wiggle the joints loose
Replace the PVC every three years or paint it with UV resistant spray to extend its life. I kept my first one for four seasons before it got too crispy.
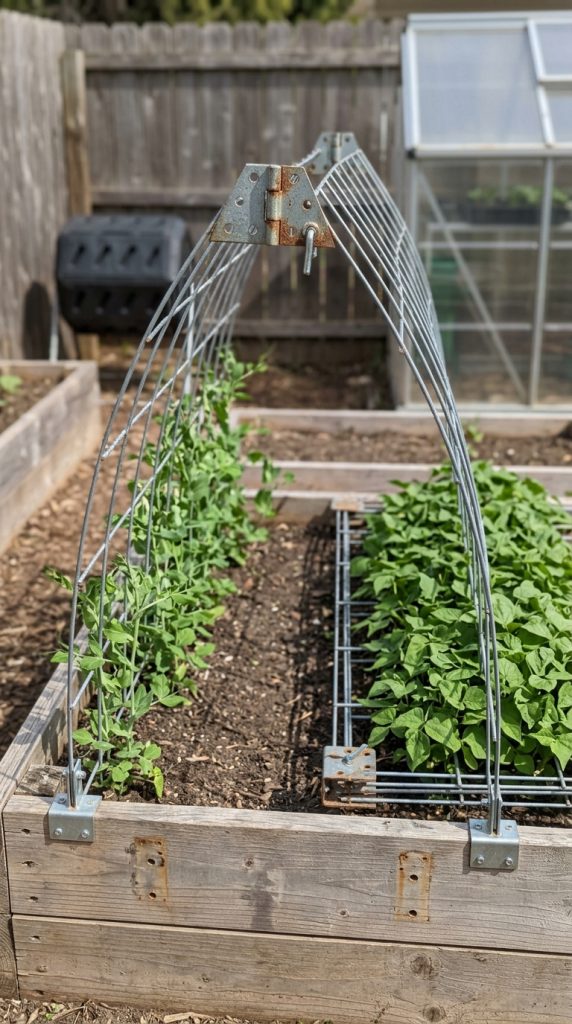
3. Welded Wire Remesh Arch with Removable Legs
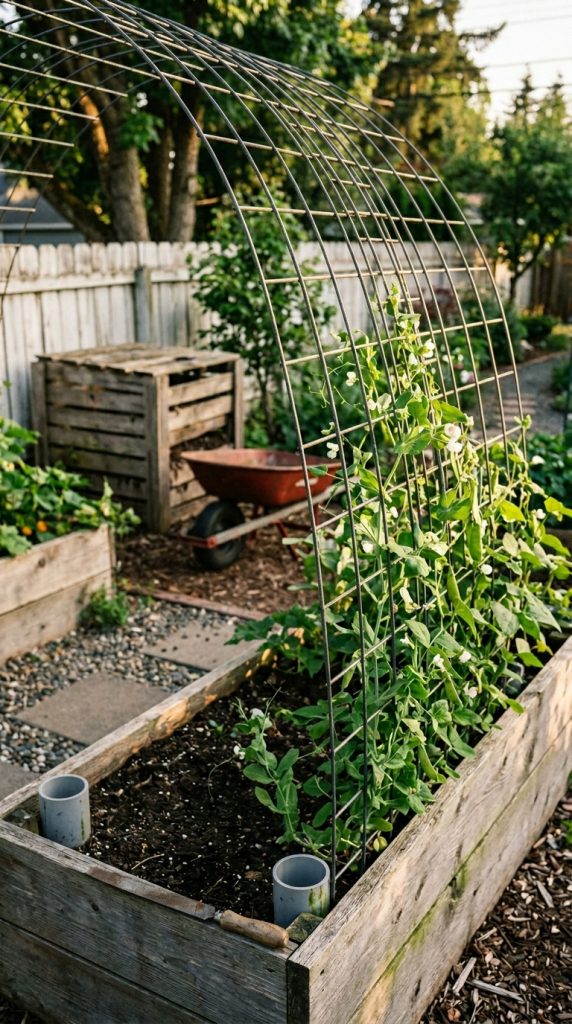
Here is the arch I wish I had built first. Concrete remesh is a welded wire grid sold at home improvement stores. It is heavier than cattle panel but has smaller two inch by two inch squares perfect for peas and beans. The real genius move is adding removable legs.
Cut the remesh to your desired arch length. Then cut two separate two-foot sections of remesh to act as legs. Attach the legs to the main arch using rebar wire or metal zip ties. Slide PVC pipes over the bottom ends of the legs, then insert the PVC into ground sockets made from larger diameter pipe buried in your raised bed corners.
Pros
- Smaller grid spacing supports all climbing crop types
- Removable legs let you take the arch down for winter
- Steel construction holds up to heavy winds
- Rust develops a protective patina over time
Cons
- Concrete remesh has sharp cut ends that need filing
- Heavier than cattle panels to move around
- Costs around thirty dollars per arch
File every cut edge with a metal file before handling. I learned this lesson when I sliced my palm open and bled all over my tomato starts.
4. Two-Tier Arch with Lower Side Trellises
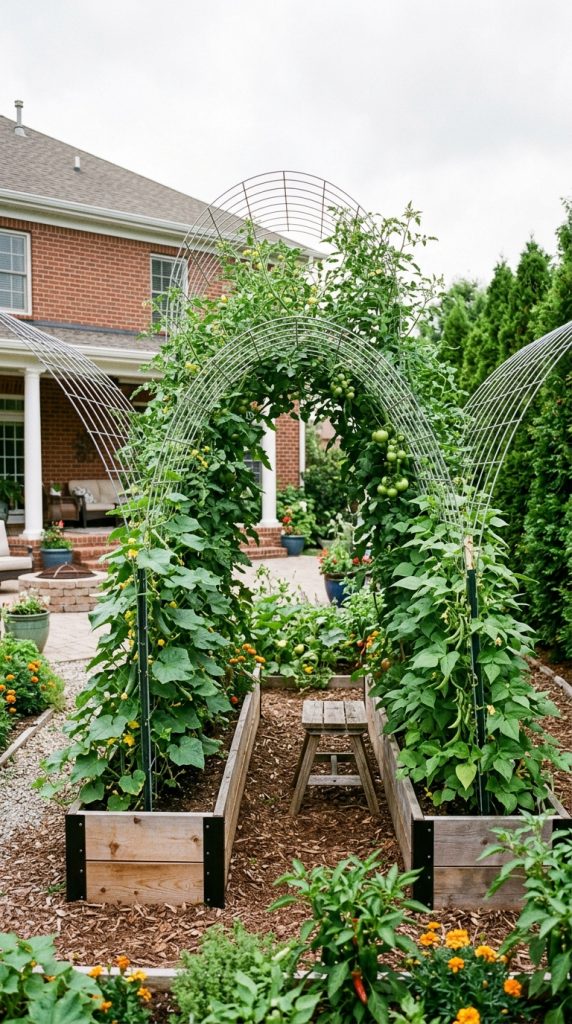
Why stop at one arch when you can have three? This design uses a main arched trellis running the length of your raised garden bed with an arched trellis in the center, plus two shorter trellises running along the outer edges. You end up with a tunnel that has side wings for extra growing space.
Build the main arch using cattle panel. Then attach two additional panels at forty-five degree angles from the outer edges of your raised bed. The side panels rest on the ground outside the bed and arch inward toward the main structure. Plant indeterminate tomatoes on the main arch, cucumbers on the left side, and pole beans on the right.
Pros
- Triples your vertical growing space in the same footprint
- Creates a stunning visual display from every angle
- Side panels act as wind breaks for delicate center plants
- Impresses every single person who sees your garden
Cons
- Requires a raised bed at least six feet long to fit everything
- Uses three cattle panels at significant cost
- Makes weeding the center area awkward
This is the arch system I built for my main vegetable bed three years ago. Every August, I sit underneath the canopy of beans and marvel at how much food comes out of such a small space.
5. Copper Pipe Arch for Small Space Gardens
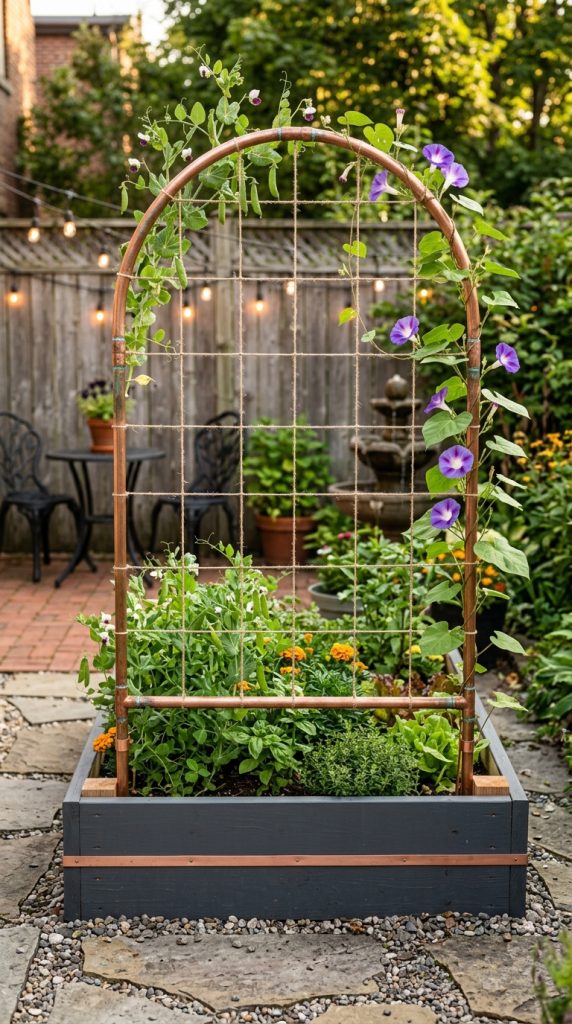
Here is the prettiest arch you will ever build. Copper pipes cost more than PVC or steel, but they develop a gorgeous green patina over time that looks like it belongs in a magazine. Plus, copper naturally repels slugs and snails, which tend to hide under leafy trellis plants.
Use half-inch copper pipes and soldered elbow joints to create a rigid arch frame. Attach cotton twine or jute netting between the two sides to create climbing surfaces. Mount the entire arch onto wooden posts set inside your raised bed corners using copper pipe straps.
Pros
- Adds serious visual value to your garden
- Copper patina looks better with age, not worse
- Natural slug repellent protects your climbing crops
- Rigid frame will not sag or wobble
Cons
- Copper prices make this an expensive option
- Requires soldering skills or hiring help
- Can be stolen by scrap metal hunters in some areas
I only recommend copper if your raised bed is visible from your house or patio. The beauty deserves to be seen. Hide it in a back corner, and you are wasting money.
6. Repurposed Metal Arch from Old Headboard
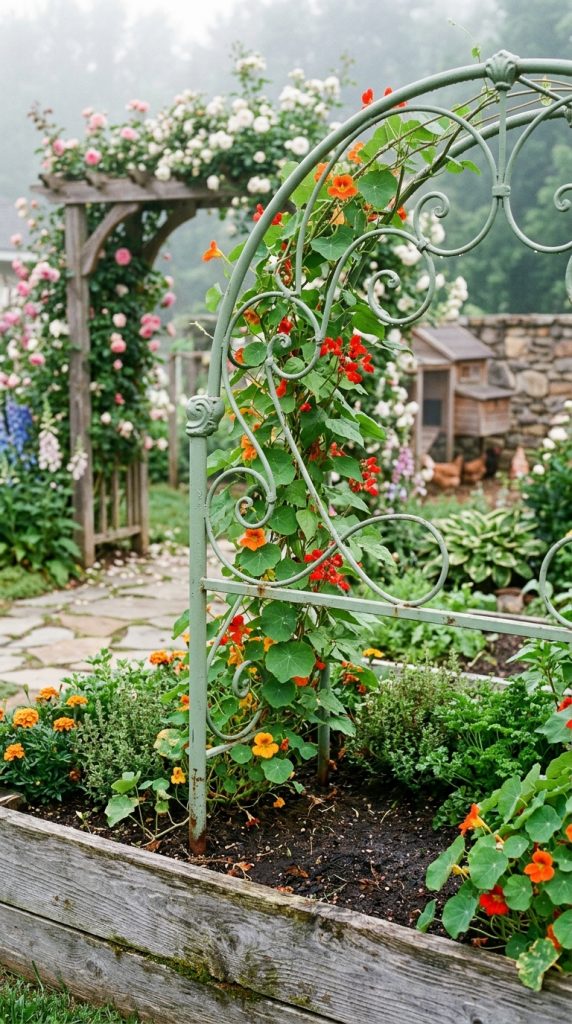
One of my favorite garden rules is never buy new if old will work better. Keep an eye on curbs during bulk trash pickup or scroll through Facebook Marketplace for metal headboards and footboards. The arched ones from vintage iron beds make perfect trellises for raised garden beds.
Cut the headboard legs to your desired height using a hacksaw. Dig the legs into the soil inside your raised bed or attach them to the wooden frame using heavy duty brackets. The existing metal bars give climbing plants everything they need while looking like an intentional design feature rather than a farm supply leftover.
Pros
- Often free or under ten dollars
- Comes pre-painted in charming vintage colors
- Extremely sturdy wrought iron construction
- Becomes a conversation piece in your garden
Cons
- Requires searching and waiting for the right piece
- Cutting iron with a hacksaw takes elbow grease
- Size is whatever you find, not whatever you need
I found a chipping white headboard on the side of the road last spring. After wire brushing and spray painting it sage green, I get compliments from every visitor.
7. Adjustable Telescoping Arch
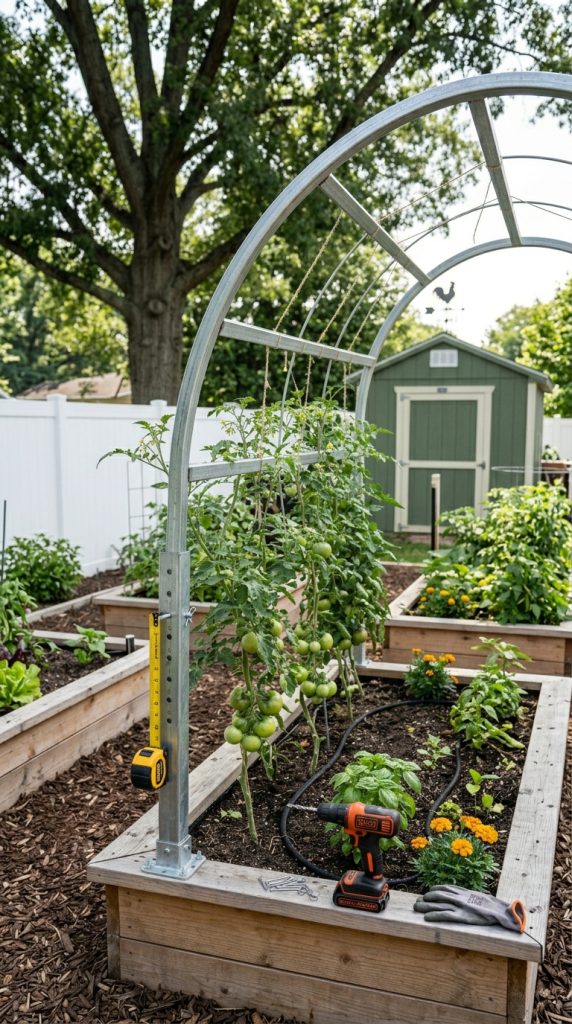
Standard arches have one height and one shape. But what if you want to grow peas in spring, then switch to taller tomatoes in summer? You need an adjustable arch. Build the frame using two sizes of square steel tubing, one that slides inside the other. Drill holes every few inches so you can change the height using removable pins.
Mount the outer tubing into concrete footings or into your raised bed corners using flanges. Slide the inner tubing up or down depending on your current crops. Lower everything in winter to reduce wind exposure. Raise it to full height during peak growing season when your plants need every inch.
Pros
- One arch works for every climbing crop you grow
- Lowering the arch protects it from winter storm damage
- Pin system takes two seconds to adjust
- Steel construction lasts for decades
Cons
- Drilling precise holes requires a drill press or steady hand
- Square tubing costs more than round pipe
- The sliding fit needs to be perfect or it will bind
This is overkill for most home gardeners. But if you are the type who loves building things precisely, you will adore this project.
8. Living Willow Arch

Here is the most magical option on this list. Living willow branches root and grow when you stick them in damp soil. Weave fresh-cut willow whips into an arch shape over your raised bed, and within one season, the branches will fuse together into a living, breathing trellis that leafs out every spring.
You need male willow varieties because female willows produce messy cottony seeds. Source the whips from a local willow grower or cut them from an existing tree in late winter. Insert the thick ends into the soil inside your raised bed, then weave the thin ends together to form the arch. Keep the soil very wet for the first year.
Pros
- Absolutely stunning living sculpture
- Provides habitat for beneficial insects and birds
- Grows thicker and stronger every single year
- Costs almost nothing if you have access to willow trees
Cons
- Takes three years to reach full strength
- Willow roots aggressively seek water, possibly invading your bed
- Winter dormancy leaves bare branches for several months
I attempted this twice and failed both times because I did not water enough. A gardener friend succeeded on her first try by running a drip line directly to the willow bases.
9. EMT Conduit Arch with Cable Wire
Electrical metallic tubing, or EMT, is the gray metal pipe electricians use to run wires through walls. A ten foot section costs about four dollars. Bend it into an arch using a conduit bender from the hardware store rental desk. The result is a lightweight, strong, rust-resistant arch that looks surprisingly clean.
Run galvanized cable wire horizontally across the arch at six inch intervals. Crimp the cable ends to keep them from unraveling. The cable gives climbing plants a thin surface to grip, which works better for tendril climbers like cucumbers and passionfruit than thick metal bars.
Pros
- Very affordable at around eight dollars per arch
- EMT coating prevents rust and corrosion
- Conduit bender creates perfect uniform curves
- Clean industrial look fits modern gardens
Cons
- Requires renting or buying a conduit bender
- Cable wire installation takes patience and practice
- Thinner pipe can bend under very heavy crops
The conduit bender rental costs about ten dollars for four hours. Bend all your arches at once to save trips.
10. Double Arch Row for Wide Raised Beds

Standard raised beds are four feet wide. A single arch works fine for that width. But if you built an extra wide bed, say five or six feet, one arch forces plants to climb straight up the middle while leaving empty soil on both sides. The solution is two arches side by side with a walking path between them.
Build two separate cattle panel arches and install them parallel to each other inside the same raised bed. Leave eighteen inches of space between the arches. Plant climbing crops on both arches, then use the center path for tending your plants. The double arches create a cathedral effect that looks incredible.
Pros
- Fully utilizes the growing space in wide beds
- Center path makes harvesting and pruning easy
- Doubles your trellis footage without expanding your footprint
- Creates deep shade for lettuce and spinach below
Cons
- Requires a raised bed at least six feet wide
- Uses double the materials for a single bed
- The center path means losing some planting space
I built this for my six by twelve foot bed last year. Walking down the center aisle under the bean canopy feels like being inside a green dream.
11. Folding Arch for Seasonal Rotation
Not every crop needs a trellis. Sometimes you want to grow low bush beans or ground trailing squash instead of climbing things. A fixed arch wastes space during those seasons because you cannot remove it. Build a folding arch using hinges and you solve that problem completely.
Cut your arch material into two separate halves. Attach heavy duty gate hinges where the two halves meet at the top center. Mount the bottom ends to your raised bed using removable brackets. During climbing crop season, swing the two halves up and lock them together at the peak. During low crop season, fold both halves down flat against the sides of your bed.
Pros
- Adapts your raised garden bed with an arched trellis to any crop
- Folded arches act as short side trellises for peas
- Hinged design stores in minimal space
- Locking mechanism keeps everything secure when raised
Cons
- Engineering the locking mechanism takes some trial and error
- Hinges add cost and potential failure points
- Heavier arches need two people to raise and lower
This project requires more problem solving than the others. If you enjoy that kind of challenge, go for it. If not, skip to the next idea.
12. Tuteur Arch for Circular Raised Beds
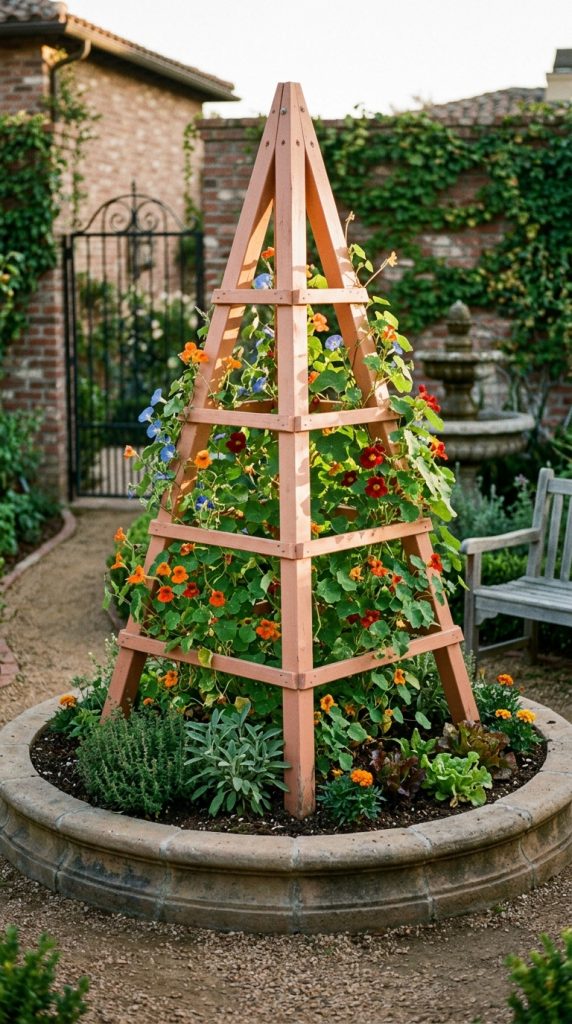
Most raised beds are rectangles. But round raised beds exist, and they need arch solutions too. A tuteur is basically a pyramid or obelisk trellis. Build three or four wooden legs that angle inward and meet at the top, creating a teepee shape with an arched opening on each side.
Cut four two-by-two lumber pieces at sixty degree angles on the top ends. Bolt them together at the peak. Spread the bottom ends evenly around your circular raised bed. Add horizontal cross pieces every twelve inches for climbing plants to grab. The result is a central arch on every side of your round bed.
Pros
- Perfect solution for non-rectangular raised beds
- Creates a stunning focal point in round gardens
- All sides get equal sun exposure
- Wood construction blends into natural settings
Cons
- Cutting compound angles requires a miter saw
- Wood needs annual sealing or painting
- Less usable climbing surface than a true arch
Paint the wood before assembling. Trust me. Trying to paint between the rungs after assembly is a slow form of torture.
13. Hybrid Arch with Removable Shade Cloth

Here is the hot climate special. Build a standard cattle panel or EMT arch over your raised bed. Then attach shade cloth to a second lightweight PVC frame that sits inside the main arch. The shade cloth frame rests on hooks so you can lift it out on cloudy days or lower it during heat waves.
Use white shade cloth rated for fifty percent light reduction for most vegetables. Leafy greens need seventy percent. Fruiting vegetables like tomatoes and peppers need only thirty percent. Experiment with different percentages depending on your summer temperatures and what you are growing.
Pros
- Protects crops from scorching afternoon sun
- Extends your growing season into hot summer months
- Reduces water evaporation from your raised bed soil
- Shade cloth frame stores completely flat
Cons
- Shade cloth costs extra and wears out after two or three years
- Installing and removing the inner frame adds a chore
- Too much shade reduces fruit production
I added this to my lettuce bed after losing two spring plantings to sudden heat waves. Now I eat salad all summer while my neighbors’ lettuce bolts in July.
14. Arch with Integrated Drip Irrigation
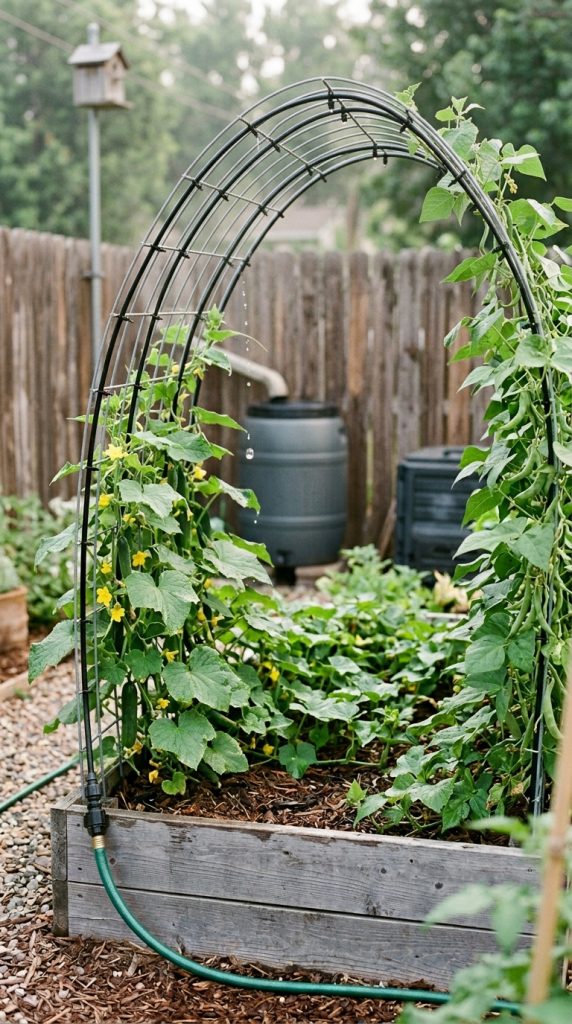
Climbing plants on an arch can be hard to water evenly. The top of the arch dries out fastest while the soil stays wet. The solution is running drip irrigation directly onto your arch. Attach quarter inch drip line along the top curve of your trellis. Install emitters every six inches pointing downward toward your climbing plants.
Connect the arch drip line to your main garden irrigation system using a quick connect fitting at the base of one leg. Run the tubing up the leg hidden behind climbing foliage. The water drips directly onto the leaves and stems, then falls onto the soil below for secondary watering.
Pros
- Waters your climbing crops exactly where they need it
- Reduces fungal diseases because leaves dry quickly
- Saves water compared to overhead sprinklers
- Disappears visually once plants leaf out
Cons
- Installing emitters along a curved surface takes patience
- Drip line can clog over time without a filter
- Adds complexity to a simple trellis build
This made the biggest difference in my cucumber production. Before irrigation, half my cucumbers curled from inconsistent watering. After adding the arch drip line, every single cucumber grew straight.
15. Roller Netting Arch for Easy Harvest
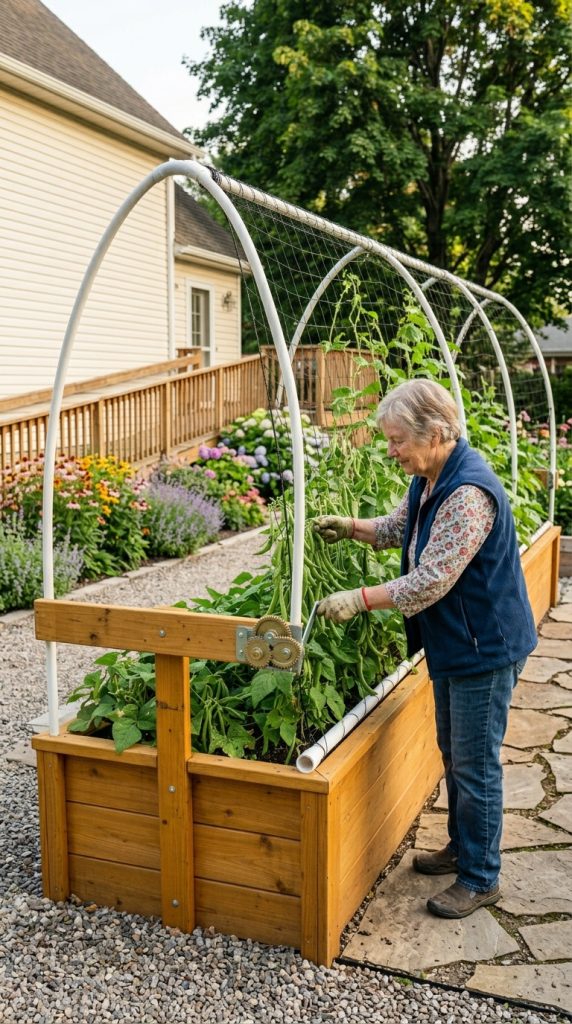
Harvesting from a tall arched trellis usually means stretching, climbing on stools, or pulling vines down. None of those are fun. Install a roller system using PVC pipe and nylon netting to bring the harvest to you. Attach a horizontal pipe at the top peak of your arch and another at the bottom edge of your raised bed.
Wrap trellis netting around the bottom pipe, then pull it up and over the top pipe. Plant your climbing crops at the base. When you need to harvest, turn a crank handle attached to the bottom pipe. The netting rolls down, bringing every bean and cucumber to waist height. Pick what you need, then roll the netting back up.
Pros
- Eliminates ladders and stretching entirely
- Makes pest inspection fast and thorough
- Children and elderly gardeners can reach everything
- Genuinely fun to use every single time
Cons
- Requires mechanical assembly and moving parts
- Netting wears out faster with rolling friction
- More expensive than static trellis designs
Is this ridiculous overkill for a backyard garden? Yes. Is it also the most delightful gardening upgrade I have ever built? Also yes.
Your Turn to Build Something Beautiful
Here is what I love most about raised garden beds with arched trellises. They turn functional vegetable growing into something that feels like art. You are not just producing food. You are creating shade, beauty, and a little pocket of magic in your own backyard.
Start with the simplest arch that fits your budget and skill level. A cattle panel arch costs almost nothing and works incredibly well. Use it for one season. Notice how much more food you harvest from that raised garden bed with an arched trellis compared to your flat beds. Then decide if you want to get fancier.
I built my first arch on a whim with scrap materials. Now I have seven of them across my garden, each one customized for a different crop and microclimate. My yard went from chaotic vegetable patches to a cohesive, productive, stunning garden that makes me smile every time I walk outside.
Pick one idea from this list. Just one. Build it this weekend. You will thank yourself when you are harvesting beans while standing flat footed on solid ground.

William Martin is a passionate bowler who spends most of his weekends playing the sport. With years of intense experience under his belt, William decided to share his knowledge by creating BOWLING OCEAN. Join me on this journey to explore the world of bowling and discover the tips and tricks to becoming a pro.